Compass (if so equipped)
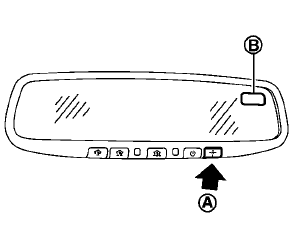
When the ignition switch is pushed to the ON position, the compass display B will indicate the direction of the vehicle’s heading.
If the display reads “C”, calibrate the compass by driving the vehicle in 3 complete circles at less than 5 MPH (8 km/h). You can also calibrate the compass by driving your vehicle on your everyday route. The compass will be calibrated once it has tracked 3 complete circles.
To turn on and off the compass manually, push
the  switchA while the ignition
switch is in
the ON position.
switchA while the ignition
switch is in
the ON position.
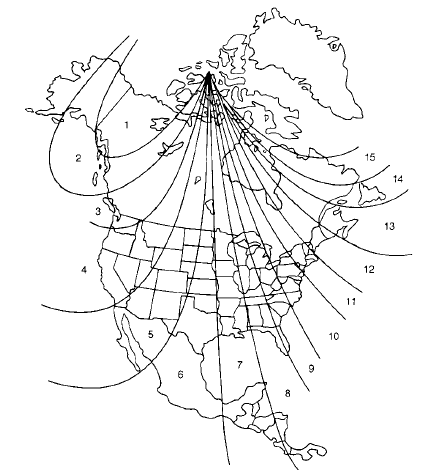
Zone map
ZONE VARIATION CHANGE PROCEDURE
The difference between magnetic north and geographical north is known as variance. In some areas, this difference can sometimes be great enough to cause false compass readings.
Follow these instructions to set the variance for your particular location if this happens:
1. Push the  switch for more than 3
seconds. The current zone number will
appear in the display.
switch for more than 3
seconds. The current zone number will
appear in the display.
2. Find your current location and variance
number on the zone map.
NOTE:
Use zone number 5 for Hawaii.
3. Push the switch repeatedly
until the
new zone number appears in the display,
then release the switch. After you release
the switch, the display will show a compass
direction within a few seconds.
• If the
compass deviates from the correct
indication soon after repeated adjustment,
have the compass checked at a
NISSAN dealer.
• The compass may
not indicate the
correct compass point in tunnels or while
driving up or down a steep hill.
(The compass returns to the correct compass point when the vehicle moves to an area where the geomagnetism is stabilized.)
CAUTION
• Do not install a ski rack, antenna, etc., which are attached to the vehicle by means of a magnet. They affect the operation of the compass.
• When cleaning the mirror, use a paper towel or similar material dampened with glass cleaner. Do not spray glass cleaner directly on the mirror as it may cause the liquid cleaner to enter the mirror housing.
See also:
Engine block heater (if so equipped)
Engine block heaters are used to assist with
cold temperature starting.
The engine block heater should be used when
the outside temperature is 208F (−78C) or lower.
To use the engine blo ...
Increasing fuel economy
GUID-08316153-E8EB-4B1D-A83C-780DAE9E7643 - Accelerate slowly and smoothly. Maintain
cruising speeds with a constant accelerator position.
- Drive at moderate speeds on the highway.
Driving at hig ...
Passenger compartment
CAUTION
Never use a fuse of a higher or lower
amperage rating than that specified on
the fuse box cover. This could damage
the electrical system or cause a fire.
If any electrical equipment doe ...