Rear-facing child restraint installation using LATCH
Refer to all Warnings and Cautions in the “Child Safety” and “Child Restraint” sections before installing a child restraint.
Follow these steps to install a rear-facing child restraint in the 2nd row seats using the LATCH system:
1. Position the child restraint on the seat. Always follow the child restraint manufacturer’s instructions.
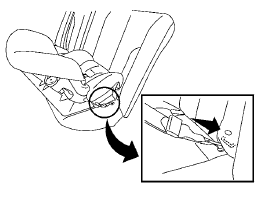
Rear-facing web-mounted – step 2
2. Secure the child restraint anchor attachments to the LATCH lower anchors. Check to make sure the LATCH attachment is properly attached to the lower anchors.
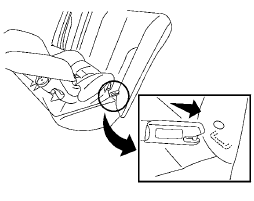
Rear-facing rigid-mounted – step 2
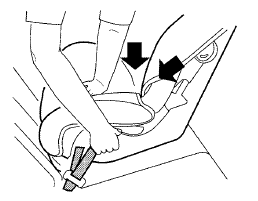
Rear-facing – step 3
3. For child restraints that are equipped with webbing-mounted attachments, remove any additional slack from the anchor attachments.
Press downward and rearward firmly in the center of the child restraint with your hand to compress the vehicle seat cushion and seatback while tightening the webbing of the anchor attachments.
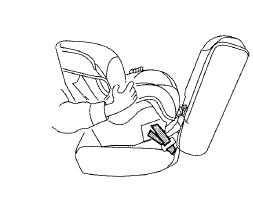
Rear-facing – step 4
4. After attaching the child restraint, test it before
you place the child in it. Push it from side
to side while holding the child restraint near
the LATCH attachment path. The child restraint
should not move more than 1 inch
(25 mm), from side to side. Try to tug it
forward and check to see if the LATCH attachment
holds the restraint in place. If the
restraint is not secure, tighten the LATCH
attachment as necessary, or put the restraint
in another seat and test it again. You may
need to try a different child restraint or try
installing by using the vehicle seat belt (if
applicable). Not all child restraints fit in all
types of vehicles.
5. Check to make sure the child restraint is
properly secured prior to each use. If the
child restraint is loose, repeat steps 2
through 4.
See also:
Armrest (Hardtop models)
Rear armrest
Pull the armrest forward until it is horizontal. ...
Brakes
If the brakes do not operate properly, have the
brakes checked by a NISSAN dealer. ...
To protect your vehicle from corrosion
• Wash and wax your vehicle often to keep
the
vehicle clean.
• Always check for minor damage to the paint
and repair it as soon as possible.
• Keep drain holes at the bottom of the
doors ...