Steering wheel switch for audio control
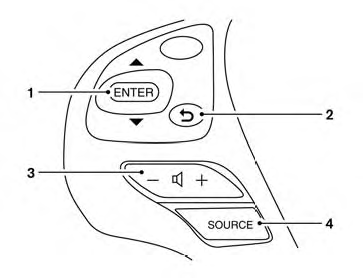
1. Menu control switch/ENTER button
2.  BACK switch
3. Volume control switch
4. Power on and SOURCE select switch
The audio system can be operated using the controls on the steering wheel.
POWER on switch
With the ignition switch in the ACC or ON position, push the SOURCE switch to turn the audio system on.
SOURCE select switch
Push the source select switch to change the mode in the following sequence:
Models without Navigation System:
AM → FM1 → FM2 → XM1 → XM2 → XM3 (satellite radio, if so equipped)→USB/iPod®* (if so equipped) → CD/DVD* → AUX* → AM.
Models with Navigation System:
AM → FM1 → FM2 → XM1 → XM2 → XM3 (satellite radio, if so equipped) → CD/DVD* → USB/iPod®*→Bluetooth® Audio*→AUX*→AM.
* These modes are only available when compatible media storage is inserted into the device.
Volume control switch
Push the volume control switch to increase or decrease the volume.
 Menu control
switch/ENTER button
Menu control
switch/ENTER button
While the display is showing a MAP, STATUS or Audio screen, tilt the Menu Control switch upward or downward to select a station, track, CD or folder. For most audio sources, tilting the switch up/down for more than 1.5 seconds provides a different function than a tilting up/down for less than 1.5 seconds.
AM and FM:
● Tilt up/down for less than 1.5 seconds to
increase or decrease the preset station.
● Tilt up/down for more than 1.5 seconds to
seek up or down to the next station.
● Press the ENTER button to show the list of
preset stations.
XM (if so equipped):
● Tilt up/down for less than 1.5 seconds to
increase or decrease the preset station.
● Tilt up/down for more than 1.5 seconds to
go to the next or previous category.
● Press the ENTER button to show the XM
Menu.
iPod® (if so equipped):
● Tilt up/down for less than 1.5 seconds to
increase or decrease the track number.
● Press the ENTER button to show the iPod
Menu.
CD:
● Tilt up/down for less than 1.5 seconds to
increase or decrease the track number.
● Tilt up/down for more than 1.5 seconds to
increase or decrease the folder number (if
playing compressed audio files).
● Press the ENTER button to show the CD
Menu.
DVD (if so equipped):
● Tilt up/down for less than 1.5 seconds to
increase or decrease the track number.
● Tilt up/down for more than 1.5 seconds to
increase or decrease the title number.
● Press the ENTER button to select an item
from the DVD display.
● When the transparent operation menu appears,
the switch will control the menu.
USB (if so equipped):
● Tilt up/down for less than 1.5 seconds to
increase or decrease the track number.
● Tilt up/down for more than 1.5 seconds to
increase or decrease the folder number.
● Press the ENTER button to show the USB
Menu.
Bluetooth® Audio (if so equipped):
● Tilt up/down for less than 1.5 seconds to increase or decrease the track number.
AUX:
● Press the ENTER button to show the AUX Menu.
BACK switch
Press the  switch to return to
the previous
screen or cancel the current selection.
switch to return to
the previous
screen or cancel the current selection.
See also:
Break-in schedule
CAUTION
During the first 1,200 miles (2,000 km),
follow these recommendations to obtain
maximum engine performance and
ensure the future reliability and economy
of your new vehicle. Failure to
f ...
Push-button ignition switch operation
When the ignition switch is pushed without
depressing the brake pedal, the ignition switch
position will change as follows:
• Push center once to change to ACC.
• Push center two times to ch ...
Maintenance requirement
Some day-to-day and regular maintenance is
essential to maintain your vehicle’s fine mechanical
condition, as well as its emission and engine
performance.
It is the owner’s responsibility to ...