
Basic Information. Programming HomeLink
Basic Information
The HomeLink Universal Transceiver provides a convenient way to combine the functions of up to three individual handheld transmitters into one built-in device in the Nissan Murano.
HomeLink Universal Transceiver:
- Will operate most Radio Frequency (RF) devices, such as garage doors, gates, home and office lighting, entry door locks, and security systems.
- Is powered by the vehicle's battery and does not require separate batteries. If the vehicle battery is discharged or disconnected, HomeLink will retain all stored programming.
When the HomeLink Universal Transceiver is programmed, keep the original transmitter for future programming procedures, such as when programming another vehicle or replacing equipment.
Upon sale of the vehicle, the programmed HomeLink Universal Transceiver buttons should be erased for security purposes.
WARNING
- Do not use the HomeLink Universal Transceiver with any garage door opener that does not have safety stop and reverse features required by federal safety standards. These standards became effective for opener models manufactured after April 1, 1982. A garage door opener that cannot detect an object in the path of a closing door and then automatically stop and reverse does not meet current federal safety standards. Using a garage door opener without these safety features increases the risk of serious injury or death.
- During the programming procedure, your garage door or security gate may open and close if the transmitter is within range. Make sure all people, pets, and objects are clear of the garage door, gate, or other device being programmed.
- The vehicle engine should be turned off while programming the HomeLink Universal Transceiver. Do not
breathe exhaust gases, as they contain colorless and odorless carbon monoxide. Carbon monoxide is
dangerous.
It can cause unconsciousness or death.
Programming HomeLink
The following steps provide general instructions for programming a HomeLink button in the Nissan Murano. The exact process may vary slightly depending on the type of device being programmed, such as a garage door opener, gate system, or other compatible RF device.
If you have questions or experience difficulty programming the HomeLink buttons, refer to the HomeLink website at www.homelink.com/nissan or call 1-800-355-3515 for assistance.
NOTE: It is recommended that a new battery be installed in the hand-held transmitter for the device being programmed to HomeLink. A fresh battery can help improve radio-frequency transmission and may make the programming process faster and more reliable.
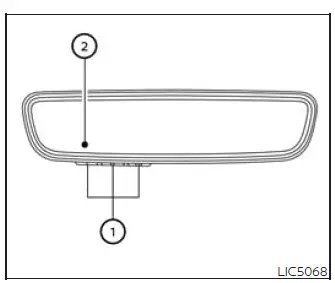
- HomeLink buttons (1-3)
- Indicator light (appears above each HomeLink button)
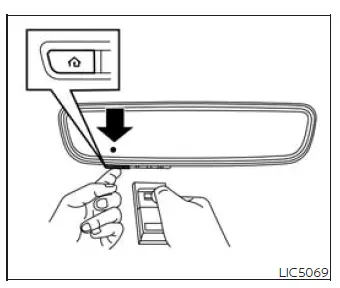
1. Position the end of your hand-held transmitter approximately 1-3 inches (2-8 cm) away from the HomeLink button you want to program. Keep the HomeLink indicator light in view while performing this step.
2. Press and hold the selected HomeLink button and the hand-held transmitter button at the same time. Continue holding both buttons until the HomeLink indicator light changes from a slow blink to a rapid blink. Once the indicator changes, release both the HomeLink button and the hand-held transmitter button.
NOTE: Some hand-held transmitters, including certain garage door opener remotes, may program more effectively when held 6-12 inches (15-20 cm) away from the HomeLink button. If programming is unsuccessful, try adjusting the distance and repeating the procedure.
3. Firmly press the programmed HomeLink button, hold it for five seconds, and release it. Repeat this up to two separate times to activate the door or device. If the device does not activate, press and hold the newly trained HomeLink button and observe the indicator light.
- If the indicator light remains steadily illuminated, programming is complete and the device should operate when the HomeLink button is pressed and released.
- If the indicator light blinks rapidly for two seconds and then changes to a steady light, continue with Programming steps 4-6 to complete setup for a rolling code device, which is most commonly used with garage door openers.
NOTE: Some devices may require replacing Programming Step 2 with the procedures described in the "Programming HomeLink for Canadian customers and gate openers" section. If the HomeLink indicator light does not change to a rapid blink after following these steps, contact HomeLink at www.homelink.com.
4. At the garage door opener motor, security gate motor, or similar device, locate the "Learn" or "Set" button. This button is usually found near the point where the hanging antenna wire attaches to the motor-head unit. Refer to the device's manual to identify the correct button.
The name, color, and location of the button may vary by manufacturer.
NOTE: A ladder and/or a second person may make the garage door programming steps easier. Do not stand on the Nissan Murano to perform the garage door programming procedure.
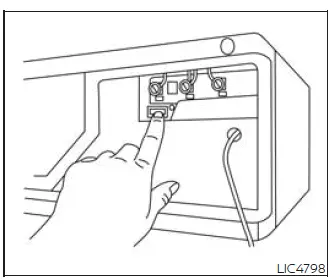
Example
5. Firmly press and release the "Learn" or "Set" button until the indicator on the garage door opener motor or device illuminates.
After the button is pressed, you have approximately 30 seconds to begin the next step.
6. Return to the vehicle and firmly press the programmed HomeLink button, hold it for two seconds, and release it. Repeat this process up to three times if needed. Do not press the HomeLink button rapidly.
At this point, programming should be complete, and the device should operate when the HomeLink button is pressed and released.
7. If you have questions or difficulty programming the HomeLink buttons in the Nissan Murano, refer to the HomeLink website at www.homelink.com/nissan or call 1-800-355-3515.
See also:
Hardtop models
1. Hood
2. Headlight and turn signal lights
— Switch operation
— Bulb replacement
3. Windshield wiper and washer
— Switch operation
— Rain-sensing auto wiper system
— Blade replace ...
How to adjust the screen
To adjust the Display ON/OFF, Brightness, Tint,
Color, Contrast and Black Level of the RearView
Monitor, push the SETTING button with the
RearView Monitor on, select the item key and
adjust the le ...
Break-in schedule
CAUTION
During the first 1,200 miles (2,000 km),
follow these recommendations to obtain
maximum engine performance and ensure
the future reliability and economy of
your new vehicle. Failure to fo ...