Battery replacement

Be careful not to allow children to swallow the battery and removed parts.
Keyfob
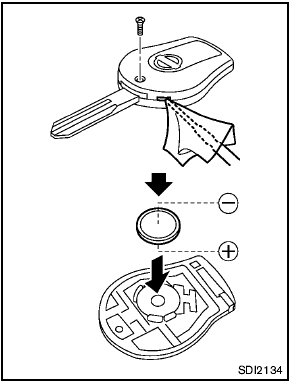
Replace the battery in the keyfob as follows:
1. Remove the screw.
2. Insert a small screwdriver into the slit of the corner and twist it to separate the upper part from the lower part. Use a cloth to protect the casing.
3. Replace the battery with a new one.
Recommended battery:
CR1620 or equivalent
- Do not touch the internal circuit and electric terminals as doing so could cause
a malfunction.
- Hold the battery by the edges. Holding the battery across the contact points will seriously deplete the storage capacity.
- Make sure that the + side faces the bottom case.
4. Close the lid securely and install the screw.
5. Operate the buttons to check its operation.
See a NISSAN dealer if you need any assistance for replacement.
FCC Notice:
For USA:
This device complies with Part 15 of the FCC Rules. Operation is subject to the following two conditions: (1) This device may not cause harmful interference, and (2) this device must accept any interference received, including interference that may cause undesired operation.
Note: Changes or modifications not expressly approved by the party responsible for compliance could void the user’s authority to operate the equipment.
For Canada:
This device complies with RSS-210 of Industry Canada. Operation is subject to the
following two conditions: (1) this device may not cause interference, and (2) this
device must accept any interference, including interference that may cause undesired
operation of the device.
Intelligent Key battery

Replace the battery in the Intelligent Key as follows:
1. Remove the mechanical key from the Intelligent Key.
2. Insert a small screwdriver into the slit of the corner and twist it to separate the upper part from the lower part. Use a cloth to protect the casing.
3. Replace the battery with a new one.
Recommended battery:
CR2025 or equivalent
- Do not touch the internal circuit and electric terminals as doing so could cause
a malfunction.
- Hold the battery by the edges. Holding the battery across the contact points will seriously deplete the storage capacity.
- Make sure that the + side faces the bottom case.
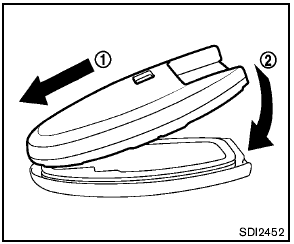
4. Align the tips of the upper and lower parts 1 , and then push them together 2 until it is securely closed.
5. Operate the buttons to check its operation.
See a NISSAN dealer if you need any assistance for replacement.
FCC Notice:
For USA:
This device complies with Part 15 of the FCC Rules. Operation is subject to the following two conditions: (1) This device may not cause harmful interference, and (2) this device must accept any interference received, including interference that may cause undesired operation.
Note: Changes or modifications not expressly approved by the party responsible for compliance could void the user’s authority to operate the equipment.
For Canada:
This device complies with RSS-210 of Industry Canada. Operation is subject to the
following two conditions: (1) this device may not cause interference, and (2) this
device must accept any interference, including interference that may cause undesired
operation of the device.
See also:
Manual operation
Fan speed control
Turn the fan speed control dial
to manually
control the fan speed.
Press the AUTO button to return to automatic
control of the fan speed.
Air recirculation
Press the air ...
Push-Button Ignition Switch
WARNING
Do not operate the push-button ignition
switch while driving the vehicle except in
an emergency. (The engine will stop when
the ignition switch is pushed 3 consecutive
times in quick succ ...
Hazard warning flasher switch
Push the switch on to warn other drivers when
you must stop or park under emergency conditions.
All turn signal lights will flash.
WARNING
• If stopping for an emergency, be
sure to move th ...