
AWD warning light
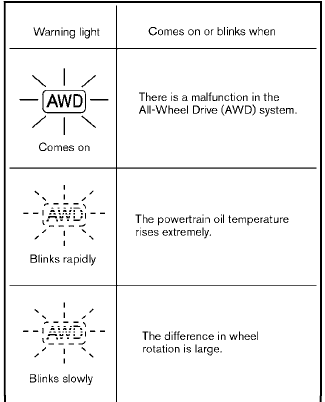
The AWD warning light is located in the meter.
The AWD warning light illuminates when the ignition switch is pushed to the ON position. It turns off soon after the engine is started.
If any malfunction occurs in the AWD system while the engine is running, the warning light will come on.
The warning light may blink rapidly (about twice per second) while trying to free a stuck vehicle due to high powertrain oil temperature. The driving mode may change to 2WD. The AUTO mode may change to the LOCK mode before the warning light blinks. If the warning light blinks rapidly during operation, stop the vehicle with the engine idling in a safe place immediately.
Then if the light turns off after a while, you can continue driving.
A large difference between the diameters of front and rear wheels will make the warning light blink slowly (about once per two seconds). Pull off the road in a safe area, and idle the engine.
Check that all tire sizes are the same, tire pressure is correct and tires are not worn.
CAUTION
• If the warning light remains on
after
the above operation, have your
vehicle checked by a NISSAN dealer
as soon as possible.
• If the warning light comes on while
driving there may be a malfunction
in the AWD system. Reduce the
vehicle speed and have your vehicle
checked by a NISSAN dealer as
soon as possible.
• The powertrain may be damaged if
you continue driving with the warning
light blinking.
• Never drive on dry hard surface
roads in the LOCK mode, as this
will overload the powertrain and
may cause a serious malfunction.
See also:
Securing the load
Cargo area luggage hooks
There are luggage hooks located in the cargo
area as shown. The hooks can be used to secure
cargo with ropes or other types of straps.
Do not apply a total load of more ...
How to use the STATUS button
To display the status of the audio, climate control
system and fuel consumption, press the STATUS
button.
The following information will appear when the
STATUS button is pressed multiple times:
...
Predictive course line settings
Models with navigation system
Models without navigation system
To turn ON or OFF the predictive course line
display, push the SETTING button, select the
“Camera” key and push the ENTER but ...