Programming HomeLink®
If you have any questions or are having difficulty programming your HomeLink® buttons, refer to the HomeLink® web site at: www.homelink.com or call 1-800-355-3515.
NOTE:
It is also recommended that a new battery be placed in the hand-held transmitter of the device being programmed to HomeLink® for quicker programming and accurate transmission of the radio-frequency.
1. Position the end of your hand-held transmitter 1-3 in (26-76 mm) away from the HomeLink® surface, keeping the HomeLink® indicator light1 in view.
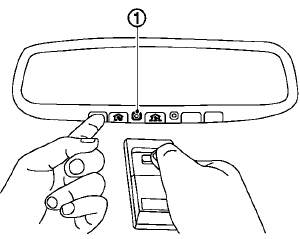
2. Using both hands, simultaneously press and hold the desired HomeLink® button and handheld transmitter button. DO NOT release until the HomeLink® indicator light1 flashes slowly and then rapidly. When the indicator light flashes rapidly, both buttons may be released. (The rapid flashing indicates successful programming.)
NOTE:
Some devices to be programmed may require you to replace Step 2 with the cycling procedure noted in the “Programming HomeLink® for Canadian customers and gate openers” later in this section.
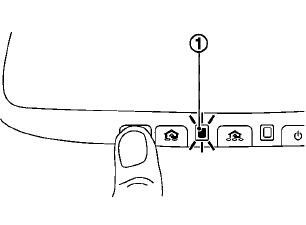
3. Press and hold the programmed HomeLink® button and observe the indicator light.
• If the
indicator light 1 is solid/continuous,
programming is complete and your
device should activate when the
HomeLink® button is pressed and released.
• If the indicator
light1 blinks rapidly for
two seconds and then turns to a solid/
continuous light, continue with Steps 4-6
for a rolling code device. A second
person may make the following steps
easier. Use a ladder or other device. Do
not stand on your vehicle to perform the
next steps.
4. At the receiver located on the garage door
opener motor in the garage, locate the
“learn” or “smart” button (the name and
color of the button may vary by manufacturer
but it is usually located near where the
hanging antenna wire is attached to the
unit). If there is difficulty locating the button,
reference the garage door opener’s manual.
5. Press and release the “learn” or “smart”
button.
NOTE:
Once the button is pressed, you have approximately 30 seconds to initiate the next step.
6. Return to the vehicle and firmly press and hold the programmed HomeLink® button for two seconds and release. Repeat the “press/hold/release” sequence up to 3 times to complete the programming process.
HomeLink® should now activate your
rolling code equipped device.
7. If you have any questions or are having
difficulty programming your HomeLink® buttons,
refer to the HomeLink® web site at:
www.homelink.com or call 1-800-355-
3515.
See also:
OFF button
Switch beeps
With this option on (indicator light illuminated), a
beep will sound if any control panel button is
pressed.
To change the display brightness, press
the OFF button. Pressing the b ...
NISSAN Intelligent Key®
WARNING
● Radio waves could adversely affect
electric medical equipment. Those who
use a pacemaker should contact the
electric medical equipment manufacturer
for the possible influences bef ...
Break-in schedule
CAUTION
During the first 1,200 miles (2,000 km),
follow these recommendations to obtain
maximum engine performance and ensure
the future reliability and economy of
your new vehicle. Failure to fo ...