How to switch the display

A : Original screen before the RearView
Monitor is operated
B : Rear-wide view screen
C : Rear view screen
1 : Shift lever is moved into the R(Reverse)
position
2 : Shift lever is moved out of the R (Reverse)
position
3 : Select the “View” key on the screen
• When the shift lever is moved into the
R
(Reverse) position1 while another screen
A is displayed, RearView Monitor operates
and the rear-wide view B is displayed.
• When selecting the “View” key on the
screen using the multi-function controller
and pushing the ENTER button 3 , the
view on the screen will change to the
rearview screen C . When the “View” key
is pushed again3 , the rear-wide view B
is displayed.
• The rear-wide view screen and/or rear view
screen switches to another screen A
when the shift lever is moved out of the R
(Reverse) position2 .

Rear view
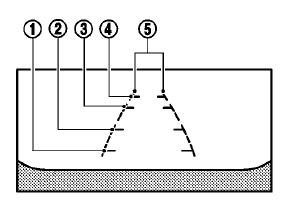
Guiding lines which indicate the vehicle width and distances to objects with reference to the bumper line A are displayed on the monitor.
Distance guide lines:
Indicate distances from the bumper.
• Red line1 : approx. 1.5 ft (0.5 m)
• Yellow line2 : approx. 3 ft (1 m)
• Green line3 : approx. 7 ft (2 m)
• Green line4 : approx. 10 ft (3 m)
Vehicle width guide lines5 :
Indicate the vehicle width when backing up.
Predictive course lines 6 (Rear view only):
Indicate the predictive course when backing up.
The predictive course lines will be displayed on the monitor when the shift lever is in the R (Reverse) position and the steering wheel is turned. The predictive course lines will move depending on how much the steering wheel is turned and will not be displayed while the steering wheel is in the neutral position.
Rear-wide view
The rear-wide view displays an approximately 180-degree area. The predictive course lines are not displayed on the rear-wide view.
Distance guide lines:
Indicates distances from the bumper.
• Red line1 : approx. 1.5 ft (0.5 m)
• Yellow line2 : approx. 3 ft (1 m)
• Green line3 : approx. 7 ft (2 m)
• Green line4 : approx. 10 ft (3 m)
Vehicle width guide lines5 :
Indicates the vehicle width when backing up.
See also:
Parking/parking on hills
WARNING
• Do not stop or park the
vehicle over
flammable materials such as dry
grass, waste paper or rags. They
may ignite and cause a fire.
• Safe parking procedures require
...
Xenon headlights (if so equipped)
WARNING
HIGH VOLTAGE
• When xenon
headlights are on, they
produce a high voltage. To prevent
an electric shock, never attempt to
modify or disassemble. Always have
your xenon headlights re ...
Regulatory information
FCC Regulatory information
• CAUTION: To maintain compliance with
FCC’s RF exposure guidelines, use only
the supplied antenna. Unauthorized antenna,
modification, or attachments could damage
...