Installing front license plate

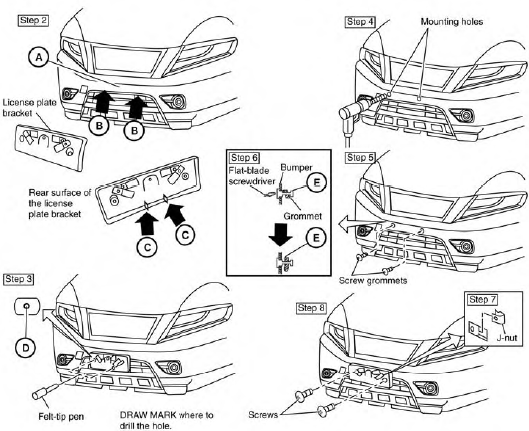
Use the following steps to mount the front license plate:
Before mounting the license plate, confirm that the following parts are enclosed in the plastic bag:
● License plate bracket
● License plate bracket (J-nut) screws x 2
● License plate screws x 2
● Screw grommets x 2
1. Park the vehicle on flat, level ground.
2. Locate the center position A as illustrated.
Line up the license plate bracket under the top of the front bumper B with the tabs C .
Hold the license plate bracket in place.
3. Mark the center of the hole D with a felt-tip
pen.
4. Carefully drill two pilot holes using a 0.39 in
(10 mm) drill bit at the marked locations. (Be
sure that the drill only goes through the
bumper fascia.)
5. Insert the grommets into the holes in the
bumper fascia.
6. Insert a small flat-bladed screwdriver into
the grommet hole to turn the threaded part of
the grommet 90° E .

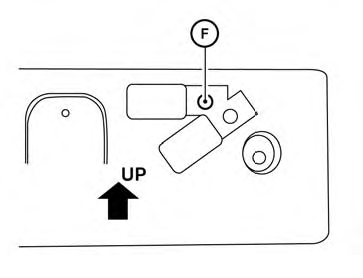
Mark the center of the hole F on both sides with a felt-tip pen. Remove the bracket from the bumper, and then open 0.79 in (20 mm) diameter holes on the bumper using the marks F as a center.
7. Insert a J-nut into the license plate bracket
before placing the license plate bracket on
the fascia.
8. Install the license plate bracket with screws.
9. Install the license plate with bolts that are no
longer than 0.55 in (14 mm).
See also:
Parking brake break-in
Break in the parking brake shoes whenever the
stopping effect of the parking brake is weakened
or whenever the parking brake shoes and/or
drums/rotors are replaced, in order to assure the
best bra ...
Rapid air pressure loss
Rapid air pressure loss or a “blow-out” can occur
if the tire is punctured or is damaged due to
hitting a curb or pothole. Rapid air pressure loss
can also be caused by driving on under-inflate ...
Treadwear
The treadwear grade is a comparative rating
based on the wear rate of the tire when tested
under controlled conditions on a specified
government test course. For example, a tire
graded 150 would w ...
