
LED Daytime Running Lights (DRL) system
The LED Daytime Running Lights (DRL) system on the Nissan Murano is designed to illuminate automatically at full
intensity when the engine is started and the parking brake is released. The LED DRL operate with the headlight
switch in any position, helping improve the vehicle's visibility to other road users during daytime driving.
When the headlight switch is turned to the  position for full illumination, the LED DRL remain
on but operate at a reduced intensity.
position for full illumination, the LED DRL remain
on but operate at a reduced intensity.
If the parking brake is applied before the engine is started, the LED DRL do not illuminate. This prevents the daytime running lights from activating while the vehicle is still secured by the parking brake.
The LED DRL illuminate once the parking brake is released. They will remain on during operation until the ignition switch is placed in the OFF position.
At dusk, the headlights, interior controls, and switches will automatically illuminate when the headlight switch is set to the AUTO position, allowing the lighting system to respond to changing ambient light conditions.
WARNING When the LED DRL system is active, the tail lights on your vehicle are not illuminated. At dusk, in low-light conditions, or whenever visibility is reduced, it is necessary to turn on the headlights. Failure to do so can make the rear of the vehicle less visible and could cause an accident resulting in injury to yourself or others.
Front Decorative Light
The front decorative light, mounted in the front bumper fascia of the Nissan Murano, illuminates only when the required operating conditions are met. This lighting element is intended to complement the vehicle's front appearance and visibility, but it does not replace the main headlights.
- The ignition is in the ON position.
- The headlight switch is in the OFF or AUTO position.
- The parking brake is not applied.
- The turn signal is not activated on the same side as the decorative light.
WARNING When the headlights are turned on, the front decorative light switches to a reduced light output. This change in brightness is normal and helps the lighting system operate appropriately with the main exterior lights.
Turn the headlight switch to the  position for full illumination when
driving at night. The front decorative light is not a substitute for the vehicle's headlights and should not be
relied on as the primary lighting source.
position for full illumination when
driving at night. The front decorative light is not a substitute for the vehicle's headlights and should not be
relied on as the primary lighting source.
WARNING At dusk, at night, or whenever road visibility is limited, it is necessary to turn on the headlights. Failure to use the proper exterior lighting could reduce your ability to see and be seen, increasing the risk of an accident and injury to yourself and others.
Instrument brightness control
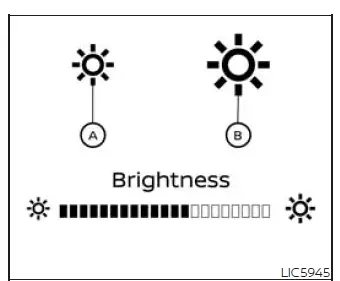
Press the smaller icon A to decrease the brightness of the instrument panel lights. Reducing the brightness can make the display more comfortable to view during nighttime driving or in darker surroundings.
Press the larger icon B to increase the brightness of the instrument panel lights. Increasing the brightness may improve visibility of gauges and controls in brighter conditions.
Turn signal switch
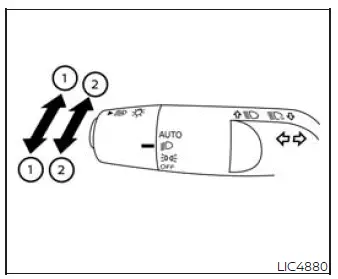
Basic Information
Turn signal:
1 Move the lever upward or downward to signal the intended turning direction. After the turn is completed, the turn signal cancels automatically, helping return the lever to its normal position without additional driver input.
Lane change signal:
2 Move the lever up or down until the turn signal begins to flash, but do not move it far enough for the lever to latch. Hold the lever in this position until the lane change has been completed.
For a brief lane change indication, move the lever up or down until the signal begins flashing without latching, and then release it. The turn signal will automatically flash three times.
Choose the most appropriate signaling method based on road conditions, traffic flow, and the amount of time needed to safely communicate your intended movement to other drivers.
See also:
RearView monitor (if so equipped)
When the selector lever is shifted into the R (Reverse) position, the monitor
display shows the view to the rear of the vehicle.
The system is designed as an aid to the driver in detecting large st ...
Engine cooling system
The engine cooling system is filled at the factory
with a pre-diluted mixture of 50% Genuine
NISSAN Long Life Antifreeze/Coolant (blue) and
50% water to provide year-round anti-freeze
and coolant ...
Trunk lid release switch
The trunk lid release switch A is located on
the instrument panel.
To open the trunk lid, push the release switch
down as illustrated. To close, push the trunk lid
down. ...