
Forward-facing child restraint installation using the seat belts
WARNING The three-point seat belt with Automatic Locking Retractor (ALR) must be used when installing a child restraint. ALR mode allows the belt to lock after it has been routed and tightened, helping hold the restraint securely in place.
Failure to use ALR mode will prevent the child restraint from being properly secured. The restraint could tip, shift, or remain loose, which may cause injury to a child during a sudden stop or collision. Incorrect use can also affect the operation of the front passenger air bag system.
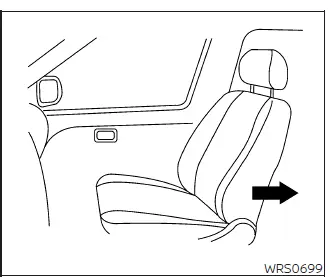
Forward-facing (front passenger seat) -
step 1
Do not use the lower anchors if the combined weight of the child and the child restraint exceeds 65 lbs. (29.5 kg). If the combined weight of the child and child restraint is greater than 65 lbs. (29.5 kg), install the child restraint with the vehicle's seat belt, not the lower anchors. Always follow the child restraint manufacturer's instructions for installation, including belt routing, tightening, recline position, and any required tether use.
Follow these steps to install a forward-facing child restraint using the vehicle seat belt in the rear seats or, when necessary, in the front passenger seat:
1. If you must install a child restraint in the front seat, it should be placed in a forward-facing direction only. Move the seat to the rearmost position so the restraint is positioned as far back as possible before installation.
Child restraints for infants must be used in the rear-facing direction and, therefore, must not be used in the front seat. A rear-facing child restraint belongs in the rear seating area, not in front of the passenger air bag.
2. Position the child restraint on the seat. Place it squarely on the seat cushion so the base sits evenly and the restraint is not tilted, twisted, or resting against trim in a way that prevents proper installation.
Always follow the child restraint manufacturer's instructions. The required belt path, recline angle, harness position, and tether instructions may differ depending on the restraint design.
The back of the child restraint should be secured against the vehicle seatback. Firm contact helps the restraint sit correctly and reduces unwanted movement when the seat belt is tightened.
If necessary, adjust or remove the head restraint/headrest to obtain the correct child restraint fit. If the head restraint/headrest is removed, store it in a secure place so it cannot move around inside the cabin. Be sure to reinstall the head restraint/headrest when the child restraint is removed.
If the seating position does not have an adjustable head restraint/headrest and it interferes with proper child restraint fit, try another seating position in the Nissan Murano or use a different child restraint that fits the seat correctly.
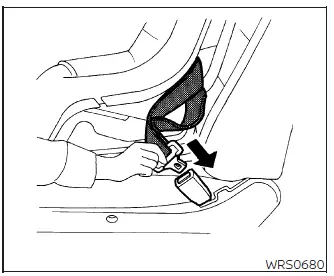
Forward-facing - step 3
3. Route the seat belt tongue through the child restraint and insert it into the buckle until you hear and feel the latch engage. Be sure to follow the child restraint manufacturer's instructions for the correct belt routing. The belt should pass through the approved path only and should not be twisted, trapped, or routed around the outside of the restraint.
If the child restraint is equipped with a top tether strap, route the top tether strap according to the manufacturer's instructions and secure the tether strap to the correct tether anchor point.
Do not install child restraints that require the use of a top tether strap in seating positions that do not have a top tether anchor. A required tether must be attached only to the designated anchor point for that seating position.
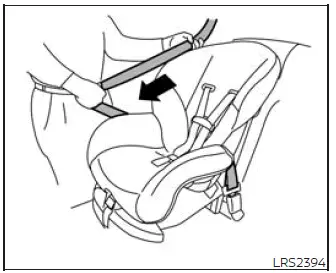
Forward-facing - step 4
4. Pull the shoulder belt out until the belt is fully extended. At this time, the seat belt retractor is placed in ALR mode, also called child restraint mode. The belt returns to ELR mode only after the seat belt is fully retracted.
5. Allow the seat belt to retract. As it retracts, pull up on the shoulder belt to remove slack from the belt path. Keep the child restraint pressed into position so the belt tightens firmly and the restraint remains properly aligned on the seat.
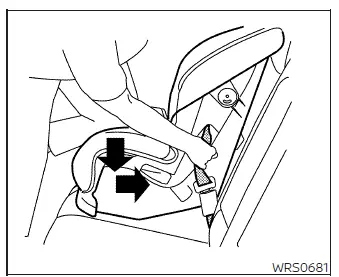
Forward-facing - step 6
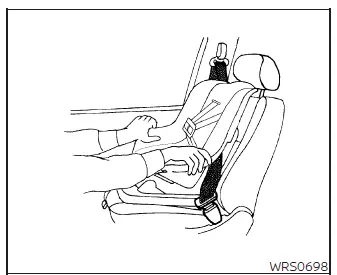
6. Remove any additional slack from the seat belt. Press downward and rearward firmly in the center of the child restraint with your knee to compress the vehicle seat cushion and seatback while pulling up on the seat belt. This helps tighten the belt through the approved belt path and allows the child restraint to sit more securely against the vehicle seat.
7. Tighten the tether strap according to the manufacturer's instructions to remove any slack. The strap should be routed correctly, attached to the proper anchor point, and tightened without pulling the child restraint out of its intended position.
Forward-facing - step 8
8. After attaching the child restraint, test it before placing the child in it. Push it from side to side while holding the child restraint near the seat belt path. The child restraint should not move more than 1 inch (25 mm) from side to side. Tug it forward and check that the belt holds the restraint firmly in place. If the restraint is not secure, tighten the seat belt as needed, or move the restraint to another seating position and test it again. You may need to try a different child restraint if a stable fit cannot be achieved.
Not all child restraints fit all types of vehicles. In the Nissan Murano, the selected child restraint must match the seating position, belt routing requirements, and the manufacturer's installation instructions before it is used.
9. Check that the child restraint is properly secured before each use. If the seat belt is not locked, or if the restraint moves more than allowed at the belt path, repeat steps 2 through 8 until the installation is secure.
Forward-facing - step 10
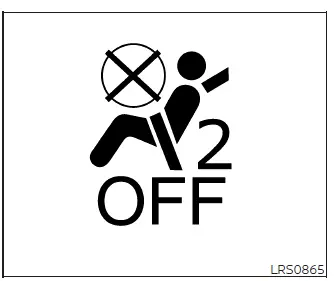
10. If the child restraint is installed in the front passenger seat, place the ignition switch in the ON
position. The front passenger air bag status light
 should illuminate. If this light is not illuminated, see "Front passenger air bag and status light". Move the
child restraint to another seating position.
should illuminate. If this light is not illuminated, see "Front passenger air bag and status light". Move the
child restraint to another seating position.
Have the system checked. It is recommended that you visit a NISSAN dealer for this service, especially if the status light does not respond as expected after the child restraint has been installed and the ignition is placed in the ON position.
After the child restraint is removed and the seat belt is fully retracted, ALR mode, also called child restraint mode, is canceled and the seat belt returns to its normal operating mode.
Installing top tether strap
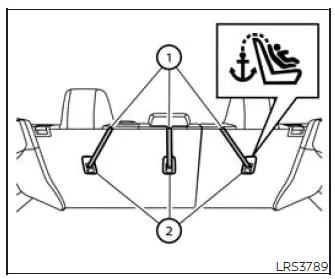
Rear bench seat
- Top tether strap, routed from the child restraint toward the designated rear seat anchor point.
- Anchor point, used to secure the tether strap for the selected child restraint installation.
First, secure the child restraint with the LATCH system or the seat belt, as applicable. The top tether strap is used after the restraint itself has been positioned and secured according to the approved installation method.
1. Position the top tether strap 1 as shown. Make sure the strap is not twisted and follows the path specified by the child restraint manufacturer.
2. Raise or remove the center head restraint/headrest as needed. If it is removed, store it in a secure place so it cannot move around inside the cabin during sudden braking or a collision. Be sure to reinstall the head restraint/headrest after the child restraint is removed.
3. Secure the tether strap to the tether anchor point 2 as shown. Confirm that the hook or connector is attached to the correct anchor point and not to cargo hardware, trim, or another nearby component.
4. Tighten the tether strap according to the manufacturer's instructions to remove any slack. Make sure the center head restraint/headrest does not contact the top tether strap or interfere with the strap's routing. Correct tether tension helps support the child restraint without shifting it away from its proper seated position in the Nissan Murano.
If you have any questions when installing a top tether strap, it is recommended that you visit a NISSAN dealer for this service. Proper routing, anchor selection, and strap tension are important parts of a secure child restraint installation.
WARNING Child restraint anchorages are designed to withstand only the loads imposed by correctly fitted child restraints.
Under no circumstances should they be used for adult seat belts, harnesses, cargo straps, accessories, or for attaching other items or equipment to the vehicle. Using the anchorages incorrectly could damage the child restraint anchorages.
A child restraint will not be properly installed using damaged anchorage, and a child could be seriously injured or killed in a collision.
See also:
Brake pad wear warning
The disc brake pads have audible wear warnings.
When a brake pad requires replacement, it
will make a high pitched scraping sound when
the vehicle is in motion. This scraping sound will
first oc ...
Tire pressure
Tire Pressure Monitoring System (TPMS)
This vehicle is equipped with the Tire Pressure
Monitoring System (TPMS). It monitors tire
pressure of all tires except the spare. When
the low tire pressure ...
Flat towing
Towing your vehicle with all four wheels on the
ground is sometimes called flat towing. This
method is sometimes used when towing a vehicle
behind a recreational vehicle, such as a motor
home.
CA ...