
Changing a flat tire (models with spare tire)
Basic information
If a tire on your Nissan Murano becomes flat, follow the instructions in this section carefully. Changing a wheel beside a road can be hazardous, so remain alert to surrounding traffic and choose the safest available location before beginning any work. If the vehicle cannot be positioned securely or you are not confident that the tire can be changed safely, contact professional roadside assistance.
Stopping the vehicle
1. Reduce speed gradually and move the vehicle completely off the road, choosing a location that is safely separated from passing traffic.
2. Turn on the hazard warning flashers to make the Nissan Murano more visible to other drivers and indicate that the vehicle is stopped because of an emergency.
3. Park on a firm, level surface and apply the parking brake securely. Press the park button to place the transmission in the P (Park) position before anyone exits the vehicle or the tire-changing procedure begins.
4. Turn off the engine and confirm that the vehicle is fully stationary.
5. Raise the hood to alert approaching traffic and help professional roadside assistance personnel identify that you require help.
6. Ask all passengers to leave the vehicle and wait in a safe location that is well away from traffic and clear of the area where the Nissan Murano will be raised with the jack.
WARNING
- Make sure the parking brake is securely applied and the shift position is placed in the P (Park) position before attempting to raise the vehicle.
- Never change a tire while the vehicle is on a slope, ice, loose ground, or another slippery or unstable surface. The vehicle or jack could shift unexpectedly, creating a serious hazard.
- Never attempt to change a tire when approaching traffic is passing close to the vehicle or when there is not enough room to work safely. Move to a safer location if possible or wait for professional roadside assistance.
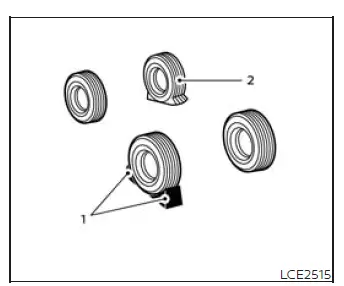
Blocking wheels
- Wheel blocks
- Flat tire location
Place suitable wheel blocks securely against both the front and rear of the wheel that is diagonally opposite the flat tire. For example, if the front-left tire is flat, block the rear-right wheel. Correctly positioning the blocks reduces the possibility of the vehicle rolling or shifting while it is supported by the jack.
WARNING Always block the appropriate wheel before raising the vehicle. If the wheel is not securely blocked, the vehicle may move unexpectedly and cause serious personal injury.
Getting the spare tire and tools
1. Open the rear liftgate to access the cargo-area storage compartment containing the spare tire and tire-changing equipment.
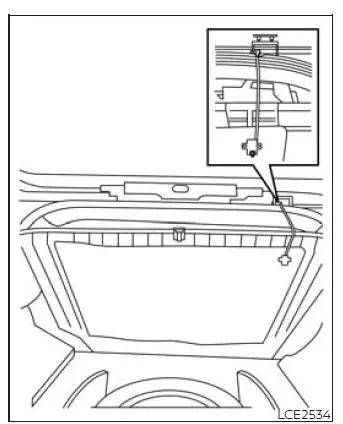
2. Pull upward on the strap to raise the carpeted floorboard. Attach the hook in the position shown so the floorboard remains securely lifted while you remove the equipment from the storage area.
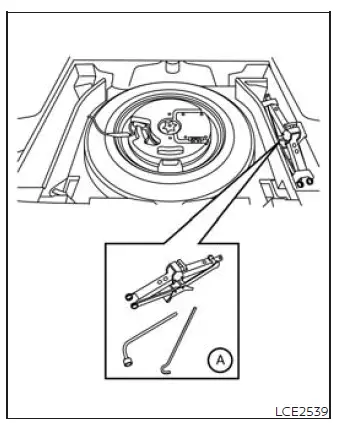
3. Remove the jack and the tire-changing tools marked A from their designated storage area. Keep the equipment together and place it where it can be reached easily without creating an obstruction around the vehicle.
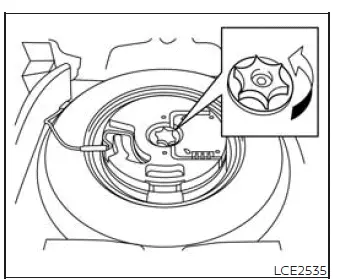
4. To release the spare tire, loosen the retaining bolt by turning it counterclockwise. Continue turning until the bolt no longer secures the tire in its storage position.
5. Once the retaining bolt is completely free, remove it and place it in a safe location so it will not be lost during the tire change.
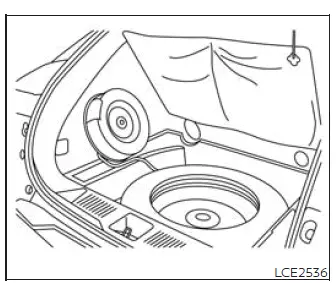
6. Carefully move the subwoofer to the lower-left corner of the cargo area and position it against the driver-side wall as illustrated. Handle the unit carefully and make sure it remains stable while the spare tire is being removed.
7. Lift the spare tire out of the storage compartment. Use proper lifting technique and maintain a secure grip, as the wheel and tire assembly may be heavy and awkward to handle.
Jacking up vehicle and removing the damaged tire
WARNING
- Never place any part of your body under the vehicle while it is supported only by the jack. If work beneath the vehicle is necessary, the vehicle must be supported by properly rated safety stands placed at suitable support points.
- Use only the jack supplied with your Nissan Murano when lifting the vehicle for a tire change. Do not use this jack to lift another vehicle, because it is designed specifically for emergency wheel replacement on this vehicle.
- Position the jack only at the correct jack-up points. Never place the jack beneath another part of the body, suspension, floor, or underbody, because an incorrect support point may be damaged or may allow the vehicle to fall.
- Raise the vehicle only high enough to remove the damaged tire and install the spare tire. Excessive lifting reduces stability and increases the risk of the vehicle shifting from the jack.
- Never place wooden blocks, bricks, stones, or other objects on top of or underneath the jack. The jack must rest directly on a firm, level, and stable surface.
- Do not start or run the engine while the vehicle is supported by the jack. Engine operation may cause movement or vibration that could destabilize the vehicle. This danger is particularly significant on vehicles equipped with limited-slip differentials.
- Do not allow any passengers to remain inside the vehicle while it is raised. Passenger movement may affect the vehicle's balance and cause it to shift on the jack.
- Never run the engine while one or more wheels are off the ground. A raised wheel may rotate or the vehicle may move unexpectedly, resulting in serious injury or property damage.
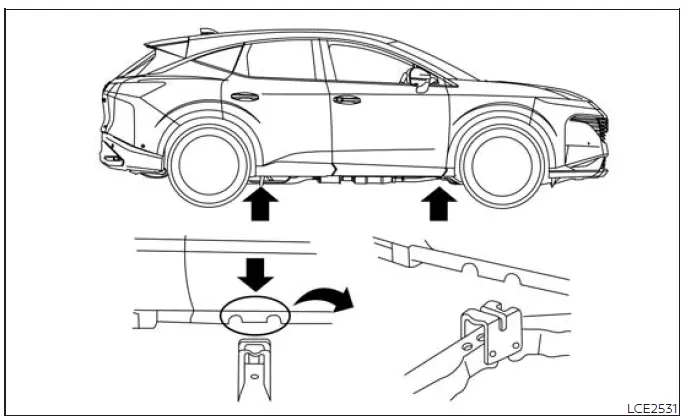
Always use the illustrations as a reference when locating the correct jack-up points and positioning the jack. The required placement may vary according to the specific Nissan Murano configuration and the type of jack supplied with the vehicle, so verify the illustrated contact point before beginning to raise the vehicle.
Carefully read the caution label attached to the jack body and review all of the following instructions before using the jack.
1. Using the wheel nut wrench, loosen each wheel nut by turning it counterclockwise 1 or 2 turns. Loosen the nuts only enough to release their initial tension. Do not remove any wheel nuts while the tire is still resting on the ground.
2. Position the jack directly beneath the designated jack-up point shown in the illustration. Make sure the top of the jack is correctly aligned and contacts the vehicle only at the specified support point.
Align the jack head between the 2 notches at the front or rear jack-up location, as illustrated. The groove in the jack head must fit correctly between the notches so the vehicle is supported at the intended point and the jack remains properly seated while lifting.
Use the jack only on firm, level ground that can support the vehicle without allowing the jack to shift or sink.
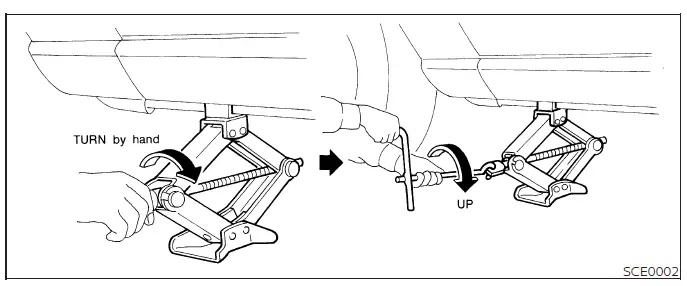
3. To raise the Nissan Murano, hold the jack lever and rod securely with both hands. Operate the jack carefully and continue lifting only until the damaged tire is completely clear of the ground. Remove the loosened wheel nuts, place them where they will not be lost, and then carefully remove the tire from the hub.
Installing the spare tire
The spare tire is intended for emergency use. Install it carefully by following the specified procedure and make sure the wheel is seated correctly before lowering the vehicle.
1. Remove any mud, dirt, or other material from the mating surfaces between the wheel and hub. The contact surfaces must be clean so the spare tire can sit evenly against the hub.
2. Carefully position the spare tire on the hub. Install all wheel nuts and tighten them by hand until they are finger-tight, confirming that each nut is threaded correctly and the wheel remains properly seated.
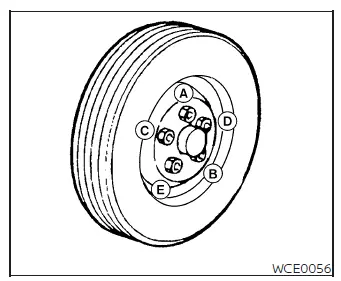
3. Using the wheel nut wrench, tighten the wheel nuts alternately and evenly in the illustrated sequence ( A , B , C , D , E ). Following this sequence helps draw the wheel evenly against the hub. Continue until all wheel nuts are firmly tightened.
4. Slowly lower the vehicle until the spare tire touches the ground and can no longer rotate freely. With the wheel nut wrench, tighten the wheel nuts securely once again in the illustrated sequence ( A , B , C , D , E ). After completing the sequence, lower the Nissan Murano fully and remove the jack.
WARNING
- Using incorrect wheel nuts or failing to tighten the wheel nuts properly may allow the wheel to loosen or separate from the vehicle while driving. This could result in loss of vehicle control and an accident.
- Do not apply oil, grease, or another lubricant to the wheel studs or wheel nuts. Lubricated fasteners may not remain securely tightened and could loosen during vehicle operation.
- Retighten the wheel nuts after the vehicle has been driven for 621 miles (1,000 km). This requirement also applies after replacing a flat tire or whenever a wheel has been removed and reinstalled.
As soon as possible, use a torque wrench to tighten the wheel nuts to the specified torque. Proper final tightening is necessary to ensure that the spare wheel remains securely installed.
Wheel nut tightening torque: 83 ft-lb (113 N·m)
The wheel nuts must remain tightened to the specified torque at all times. It is recommended that their tightness be checked and corrected to specification at every lubrication interval to help keep the wheel securely mounted.
Adjust each tire to the specified COLD tire pressure.
COLD pressure refers to the tire pressure measured after the Nissan Murano has been parked for at least 3 hours or driven less than 1 mile (1.6 km).
The correct COLD tire pressures are listed on the tire and loading information label attached to the driver-side center pillar. Use the values shown on this label when checking or adjusting tire pressure.
After the tires have been adjusted to the specified COLD pressure, the tire pressure information display, if equipped, may show readings above the COLD pressure after the vehicle has traveled more than 1 mile (1.6 km). Tire pressure naturally rises as the tires warm during driving, so this increase does not indicate a malfunction in the monitoring system.
5. Return the subwoofer to the spare tire well and loosely secure it by turning the retaining bolt clockwise several turns. Make sure the subwoofer is positioned correctly before tightening the bolt.
CAUTION Do not overtighten the retaining bolt. Excessive tightening may damage vehicle components.
6. Return all tools and jacking equipment to their designated storage locations in the Nissan Murano. Confirm that each item is properly positioned and secured so it cannot move inside the cargo area.
7. Lower the carpeted floorboard back into place over the tire well. Secure the flat tire properly beneath the floorboard and verify that the cargo floor is seated correctly.
8. Close the rear liftgate securely after confirming that the spare tire, damaged tire, tools, and jacking equipment have all been stored correctly.
WARNING
- Always make sure the spare tire and all jacking equipment are properly secured after use and stored below the upper edge of the seatback. Unsecured items may be thrown through the passenger compartment during a collision or sudden stop, creating a risk of serious injury.
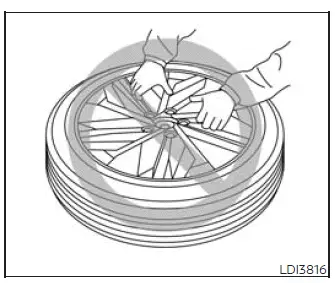
Handling of wheel insert (if so equipped)
Do not remove the insert from the wheel. If removal becomes necessary, it is recommended that the work be performed by a NISSAN dealer to reduce the risk of personal injury or damage to the wheel.
If the insert does not fit firmly in the wheel, appears loose, or produces a rattling noise while the Nissan Murano is being driven, it is recommended that you visit a NISSAN dealer for inspection. Continued driving with an improperly fitted insert may allow the condition to worsen.
CAUTION
- Do not lift or carry the wheel by gripping the insert section. The insert is not intended to support the weight of the wheel, and doing so may result in personal injury or damage to the wheel.
- Do not attempt to detach the wheel insert yourself. Improper removal may cause injury or damage the insert, wheel, or surrounding components.
See also:
Conditions the remote start will not work
The remote start will not operate if any of the
following conditions are present:
● The ignition switch is placed in the ON position.
● The hood is not securely closed.
● The haz ...
Soft top (CrossCabriolet models)
1. Soft top indicator light (on the combination
meter)
2. Soft top operating switch
3. Top lock hole
4. Soft top
5. Rear parcel shelf
6. Skylight glass
7. Rear window
8. Top storage lid
9. ...
Cleaning
If your windshield is not clear after using the
windshield washer or if a wiper blade chatters
when running, wax or other material may be on
the blade or windshield.
Clean the outside of the win ...