
Lights
Basic information
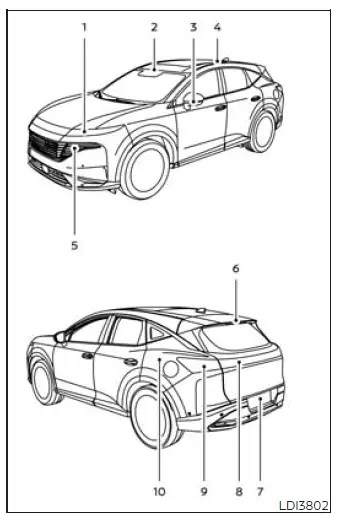
- Headlight assembly
- Map lights
- Door mirror turn signal lights (if so equipped)
- Personal lights
- Front combination light assembly
- High-mounted stop light
- License plate lights
- Backup (reversing) light assembly
- Rear combination light
- Cargo lights
The illustration identifies the primary exterior and interior light locations on the Nissan Murano. Some lighting components or their exact arrangement may vary depending on the vehicle's equipment, so confirm that the replacement part is intended for the specific lamp being serviced.
Headlights
Temporary fogging may appear inside the lenses of the exterior lights during rainy weather, after driving through a humid area, or while the Nissan Murano is being washed. This condition is caused by a temperature difference between the inside and outside surfaces of the lens, allowing a light film of condensation to develop. Minor fogging that clears naturally is normal and does not indicate a malfunction.
If large water droplets collect inside a lens, water remains trapped in the light assembly, or the condensation does not disappear, it is recommended that you visit a NISSAN dealer for inspection and service. Persistent moisture may require the lamp assembly and its sealing areas to be examined by a qualified technician.
If a headlight or related lighting component requires replacement, it is recommended that you visit a NISSAN dealer for this service. Proper installation helps ensure that the light assembly is securely fitted and functions as intended.
Exterior and interior lights
Basic information
This vehicle is equipped with LED lights in multiple exterior and interior lighting locations. LED units are designed differently from conventional replaceable bulbs, and some are integrated into complete lamp assemblies rather than serviced as individual light sources.
Visit your NISSAN dealer for LED light replacement, confirmation of the correct replacement bulb type, or any bulb-changing procedure that is not listed in this section. Using the correct component is important because bulb design, electrical rating, socket configuration, and lamp construction may differ between lighting positions on the Nissan Murano.
- Vanity mirror lights*
- Wattage (W): 5
- Bulb No.: W5W
* It is recommended that you visit a NISSAN dealer for assistance with replacement. The dealer can confirm the correct bulb and perform the procedure without damaging the lens, trim, or surrounding components.
Always check with the Parts Department at a NISSAN dealer for the latest parts information before purchasing a replacement bulb or lamp component. Parts specifications and availability may vary, and confirming the correct application helps prevent installation of an incompatible bulb.
Replacement procedures
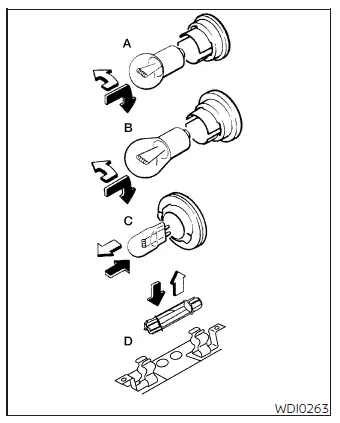
All other replaceable lights are identified as type A, B, C, or D, as shown in the illustration. The bulb type determines the correct removal and installation method, so compare the replacement bulb with the applicable diagram before beginning the procedure.
When replacing a bulb, first remove the applicable lens, lamp, and/or cover. Handle these components carefully to avoid cracking the lens, damaging retaining tabs, or marking nearby trim. Note the original position of the bulb and socket so the replacement can be installed in the same orientation.
 Indicates bulb removal. Follow the
illustrated direction when releasing or turning the bulb so that the socket and retaining components are not
forced.
Indicates bulb removal. Follow the
illustrated direction when releasing or turning the bulb so that the socket and retaining components are not
forced.
 Indicates bulb installation. Insert
and secure the replacement bulb in the illustrated direction, making sure it is correctly seated before
reinstalling the lens, lamp, or cover.
Indicates bulb installation. Insert
and secure the replacement bulb in the illustrated direction, making sure it is correctly seated before
reinstalling the lens, lamp, or cover.
See also:
Wheels and tires
...
RAB system limitations
WARNING The following limitations apply to the Rear Automatic Braking (RAB) system. Failure
to understand and follow these warnings and operating instructions could result in a collision, serious
...
Break-in schedule
During the first 1,200 miles (2,000 km), follow these recommendations to obtain
maximum engine performance and ensure the future reliability and economy of your
new vehicle. Failure to follow th ...