Audio system
Audio operation precautions
Radio
Place the ignition switch to the ACC or ON position and push the radio band select button to turn on the radio. If you listen to the radio with the engine not running, the ignition switch should be placed in the ACC position.
Radio reception is affected by station signal strength, distance from radio transmitter, buildings, bridges, mountains and other external influences. Intermittent changes in reception quality normally are caused by these external influences.
Using a cellular phone in or near the vehicle may influence radio reception quality.
Radio reception:
Your NISSAN radio system is equipped with state-of-the-art electronic circuits to enhance radio reception. These circuits are designed to extend reception range, and to enhance the quality of that reception.
However there are some general characteristics of both FM and AM radio signals that can affect radio reception quality in a moving vehicle, even when the finest equipment is used. These characteristics are completely normal in a given reception area, and do not indicate any malfunction in your NISSAN radio system.
Reception conditions will constantly change because of vehicle movement. Buildings, terrain, signal distance and interference from other vehicles can work against ideal reception.
Described below are some of the factors that can affect your radio reception.
Some cellular phones or other devices may cause interference or a buzzing noise to come from the audio system speakers. Storing the device in a different location may reduce or eliminate the noise.
FM radio reception:
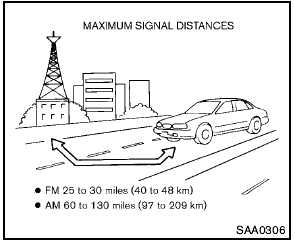
Range: FM range is normally limited to 25 to 30 miles (40 to 48 km), with monaural (single channel) FM having slightly more range than stereo FM. External influences may sometimes interfere with FM station reception even if the FM station is within 25 miles (40 km). The strength of the FM signal is directly related to the distance between the transmitter and receiver.
FM signals follow a line-of-sight path, exhibiting many of the same characteristics as light. For example they will reflect off objects.
Fade and drift: As your vehicle moves away from a station transmitter, the signals will tend to fade and/or drift.
Static and flutter: During signal interference from buildings, large hills or due to antenna position, usually in conjunction with increased distance from the station transmitter, static or flutter can be heard. This can be reduced by lowering the treble setting to reduce the treble response.
Multipath reception: Because of the reflective characteristics of FM signals, direct and reflected signals reach the receiver at the same time. The signals may cancel each other, resulting in momentary flutter or loss of sound.
AM radio reception:
AM signals, because of their low frequency, can bend around objects and skip along the ground.
In addition, the signals can be bounced off the ionosphere and bent back to earth. Because of these characteristics. AM signals are also subject to interference as they travel from transmitter to receiver.
Fading: Occurs while the vehicle is passing through freeway underpasses or in areas with many tall buildings. It can also occur for several seconds during ionospheric turbulence even in areas where no obstacles exist.
Static: Caused by thunderstorms, electrical power lines, electric signs and even traffic lights.
Satellite radio reception (if so equipped):
When the satellite radio is used for the first time or the battery has been replaced, the satellite radio may not work properly. This is not a malfunction. Wait more than 10 minutes with the satellite radio ON and the vehicle outside of any metal or large building for the satellite radio to receive all of the necessary data.
The satellite radio mode requires an active XM® Satellite Radio subscription. The satellite radio is not available in Alaska, Hawaii and Guam.
The satellite radio performance may be affected if cargo carried on the roof blocks the satellite radio signal.
If possible, do not put cargo near the satellite antenna.
A build up of ice on the satellite radio antenna can affect satellite radio performance. Remove the ice to restore satellite radio reception.
Compact Disc (CD) player
- Do not force a compact disc into the CD insert slot. This could damage the CD and/ or CD player.
- During cold weather or rainy days, the player may malfunction due to the humidity. If this occurs, remove the CD and dehumidify or ventilate the player completely.
- The player may skip while driving on rough roads.
- The CD player sometimes cannot function when the passenger compartment temperature is extremely high. Decrease the temperature before use.
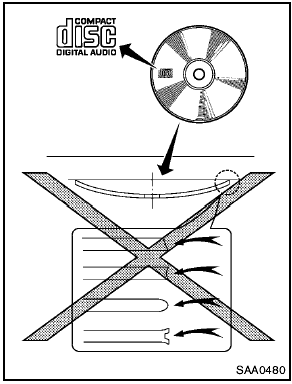
- Only use high quality 4.7 in (12 cm) round discs that have the “COMPACT disc DIGITAL AUDIO” logo on the disc or packaging.
- Do not expose the CD to direct sunlight.
- CDs that are of poor quality, dirty, scratched, covered with fingerprints, or that have pin holes may not work properly.
- The following CDs may not work properly:
— Copy control compact discs (CCCD) — Recordable compact discs (CD-R) — Rewritable
compact discs (CD-RW) - Do not use the following CDs as they may cause the CD player
to malfunction.
— 3.1 in (8 cm) discs
— CDs that are not round
— CDs with a paper label
— CDs that are warped, scratched, or have abnormal edges
- This audio system can only play prerecorded CDs. It has no capabilities to record
or burn CDs.
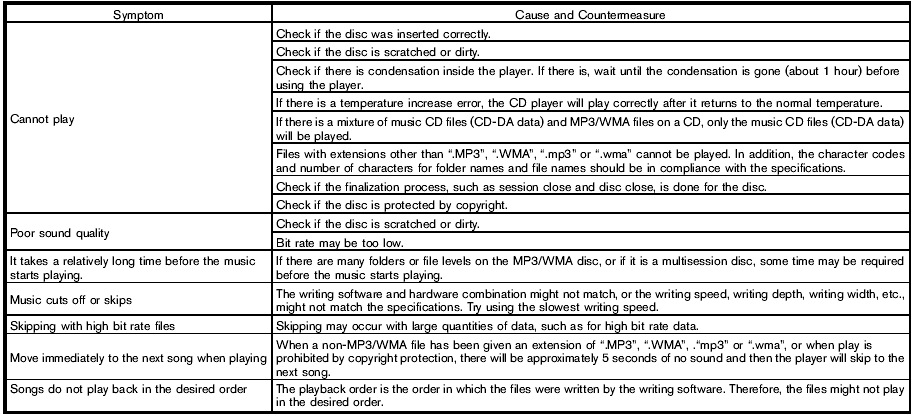
- If the CD cannot be played, one of the following messages will be displayed.
CHECK DISC:
— Confirm that the CD is inserted correctly (the label side is facing up, etc.).
— Confirm that the CD is not bent or warped and it is free of scratches.
PUSH EJECT:
This is an error due to the temperature inside the player is too high. Remove the
CD by pushing the EJECT button, and after a short time reinsert the CD. The CD can
be played when the temperature of the player returns to normal.
UNPLAYABLE:
The file is unplayable in this audio system (only MP3 or WMA CD).
USB (Universal Serial Bus) devices (if so equipped)
This system supports various USB memory sticks, USB hard drives and iPod® players.
There are some USB devices which may not be supported with this system.
- Make sure that the USB device is connected correctly into the USB connector.
- Do not force the memory stick or USB cable into the USB connector. This could damage the connector.
- During cold weather or rainy days, the player may malfunction due to humidity. If this occurs, remove the USB device and dehumidify or ventilate the USB player completely.
- The USB player sometimes cannot function when the passenger compartment temperature is extremely high. Decrease the temperature before use.
- Do not leave USB memory in a place prone to static electricity or where the air conditioner blows directly. The data in the USB memory may be damaged.
- The vehicle is not equipped with a USB memory stick.
- A USB device cannot be formatted with this system. To format a USB device, use a personal computer.
- Partitioned USB devices may not be played correctly.
- Some characters used in other languages (Chinese, Japanese, etc.) are not displayed properly on the vehicle center screen. Using English language characters with a USB device is recommended.
- Do not connect a USB device if a connector or cable is wet. Allow the cable and/or connectors to dry completely before connecting the USB device. If the connector is exposed to fluids other than water, evaporative residue may cause a short between the connector pins.
- Large video podcast files cause slow responses in an iPod®. The vehicle center display may momentarily black out, but it will soon recover.
- If an iPod® automatically selects large video podcast files while in the shuffle mode, the vehicle center display may momentarily black out, but it will soon recover.
- Audiobooks may not play in the same order as they appear on an iPod®.
- An iPod nano® (1st Generation) may remain in fast forward or rewind mode if it is connected during a seek operation. In this case, please manually reset the iPod®.
- An iPod nano® (2nd Generation) will continue to fast forward or rewind if it is disconnected during a seek operation.
- An incorrect song title may appear when the Play Mode is changed while using the iPod nano® (2nd Generation) iPod® is a trademark of Apple Inc., registered in the U.S. and other countries.
Compressed Audio Files (MP3/WMA/AAC/ATRAC3)
Explanation of terms:
- MP3 — MP3 is short for Moving Pictures Experts Group Audio Layer 3. MP3 is the most well known compressed digital audio file format. This format allows for near “CD quality” sound, but at a fraction of the size of normal audio files. MP3 conversion of an audio track can reduce the file size by approximately a 10:1 ratio (Sampling: 44.1 kHz, Bit rate: 128 kbps) with virtually no perceptible loss in quality. The compression reduces certain parts of sound that seem inaudible to most people.
- WMA — Windows Media Audio (WMA) is a compressed audio format created by Microsoft as an alternative to MP3. The WMA codec offers greater file compression than the MP3 codec, enabling storage of more digital audio tracks in the same amount of space when compared to MP3s at the same level of quality.
- AAC/M4A — Advanced Audio Coding (AAC) is a lossy audio compression format.
Audio files that have been encoded with AAC are generally smaller in size and deliver a higher quality of sound than MP3.
- ATRAC3, ATRAC3 Plus - Adaptive Transform Acoustic Coding (ATRAC) is a lossy audio compression format developed by Sony.
- Bit rate — Bit rate denotes the number of bits per second used by a digital music file.
The size and quality of a compressed digital audio file is determined by the bit rate used when encoding the file.
- Sampling frequency — Sampling frequency is the rate at which the samples of a signal are converted from analog to digital (A/D conversion) per second.
- Multisession — Multisession is one of the methods for writing data to media. Writing data once to the media is called a single session, and writing more than once is called a multisession.
- ID3/WMA Tag — The ID3/WMA tag is the part of the encoded MP3 or WMA file that contains information about the digital music file such as song title, artist, album title, encoding bit rate, track time duration, etc.
ID3 tag information is displayed on the Album/Artist/Track title line on the display.
* Windows® and Windows Media® are registered trademarks or trademarks of Microsoft Corporation in the United States of America and/or other countries.
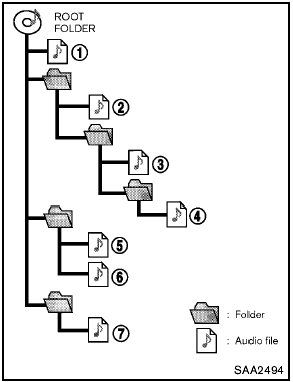
Playback order:
- The folder names of folders not containing compressed audio files are not shown in the display.
- If there is a file in the top level of a disc/USB, “Root Folder” is displayed.
- The playback order is the order in which the files were written by the writing software, so the files might not play in the desired order.
- Music playback order of compressed audio files is as illustrated.
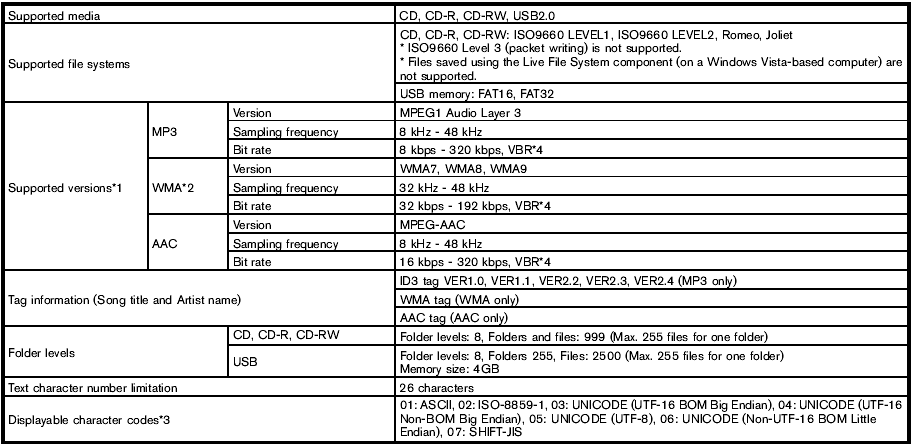
Specification chart (for FM-AM Radio with Compact Disc (CD) player):
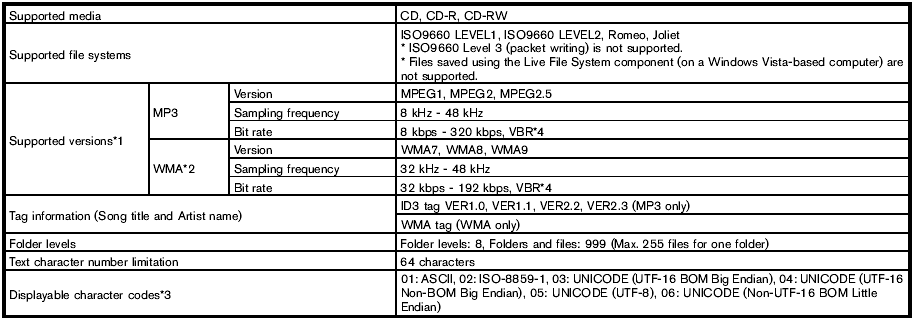
1 Files created with a combination of 48 kHz sampling frequency and 64 kbps bit rate cannot be played.
2 Protected WMA files (DRM) cannot be played.
3 Available codes depend on what kind of media, versions and information are going to be displayed.
4 When VBR files are played, the playback time may not be displayed correctly.
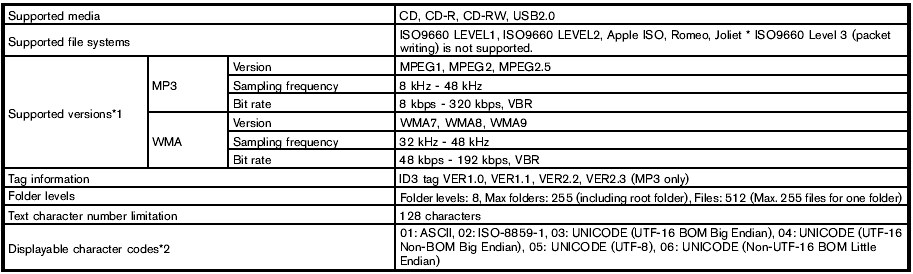
Specification chart (for FM-AM-SAT Radio with Compact Disc (CD) Player (Type A)):
1 Files created with a combination of 48 kHz sampling frequency and 64 kbps bit rate cannot be played.
2 Protected WMA files (DRM) cannot be played.
3 Available codes depend on what kind of media, versions and information are going to be displayed.
4 When VBR files are played, the playback time may not be displayed correctly.
Specification chart (for FM-AM-SAT Radio with Compact Disc (CD) Player (Type B)):
1 Files created with a combination of 48 kHz sampling frequency and 64 kbps bit rate cannot be played.
2 Available codes depend on what kind of media, versions and information are going to be displayed.
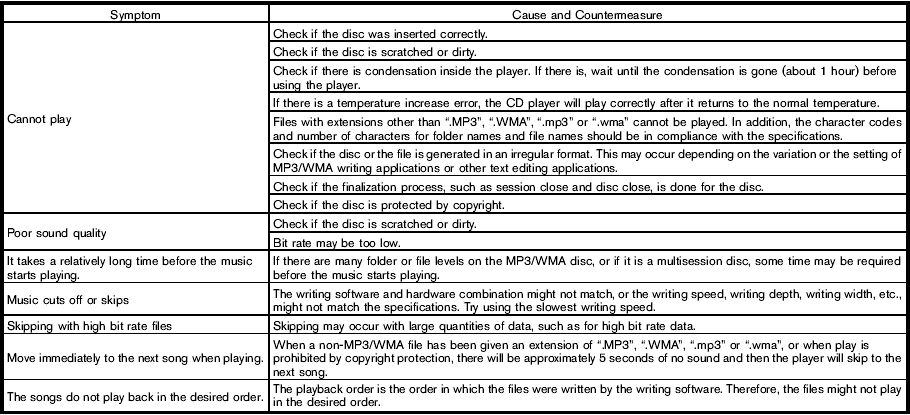
Troubleshooting guide (for FM-AM Radio with Compact Disc (CD) player):
Troubleshooting guide (for FM-AM-SAT Radio with Compact Disc (CD) player (Type A)):
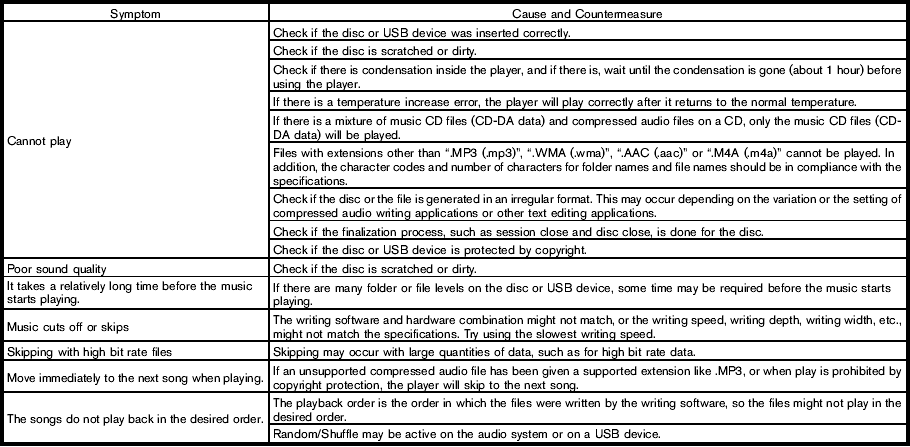
Troubleshooting guide (for FM-AM-SAT Radio with Compact Disc (CD) Player (Type B)):
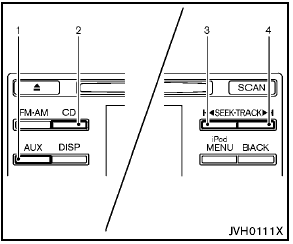
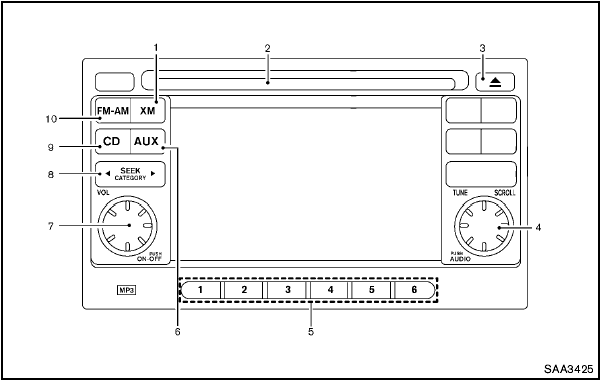
FM-AM radio with Compact Disc (CD) player
FM-AM radio with Compact Disc (CD) player
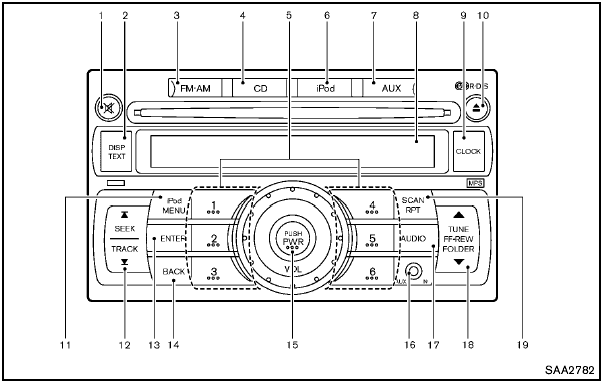
1. MUTE button
2. DISP (display)/TEXT button
3. FM·AM radio band select button
4. CD PLAY button
5. Station preset buttons
6. iPod® button
7. AUX (auxiliary) button
8. Audio display
9. CLOCK button
10. CD EJECT button
11. iPod® MENU button
12. SEEK/TRACK button
13. ENTER button
14 BACK button
15. PWR (power) button/VOL (volume) control knob
16 AUX IN jack
17. AUDIO button
18. TUNE/FF·REW button
19. SCAN/RPT (repeat) button
For all operation precautions, see “Audio operation precautions” earlier in this section.
Audio main operation
Head unit:
The auto loudness circuit enhances the low and high frequency ranges automatically in both radio reception and CD playback.
ON·OFF/Volume control:
Place the ignition switch in the ACC or ON position, and then push the PWR button while the system is off to call up the normal mode (radio, CD, AUX and iPod®) which was playing immediately before the system was turned off.
While the system is on, pushing the PWR button turns the system off.
Turn the VOL control knob to adjust the volume.

MUTE button:
Push the  button to mute the audio
sound.
button to mute the audio
sound.
Push the  button again to release
the mute setting.
button again to release
the mute setting.

AUDIO button:
Push the AUDIO button to change the selecting mode as follows.

Push the TUNE ( ,
,
 ) or SEEK (
 ,
,  ) button to adjust Bass and Treble
to the desired level. Use the TUNE or SEEK button also to adjust Fade or Balance
modes. Fade adjusts the sound level between the front and rear speakers and Balance
adjusts the sound between the right and left speakers.
) button to adjust Bass and Treble
to the desired level. Use the TUNE or SEEK button also to adjust Fade or Balance
modes. Fade adjusts the sound level between the front and rear speakers and Balance
adjusts the sound between the right and left speakers.
To turn the beep sound off or on, push the TUNE or SEEK button until the desired mode is displayed. This turns on or off the beep sound when audio buttons are pushed.
To change the Speed Sensitive Volume (Spd Sen Vol) mode to OFF, LOW, MID or HIGH, push the TUNE or SEEK button until the desired mode is displayed.
Once you have adjusted the sound quality to the desired level, push the AUDIO button repeatedly until the normal mode display reappears. Otherwise, the normal mode display will automatically reappear after approximately 5 seconds.

CLOCK button:
Push the CLOCK button to turn on or off the CLOCK display.
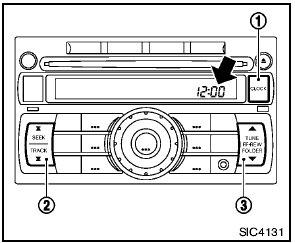
Push the CLOCK button 1 to turn the clock on or off.
1. Push and hold the CLOCK button 1 until the clock display starts to flash.
2. Push the SEEK/TRACK button 2 to adjust the hours.
3. Push the TUNE/FF·REW button 3 to adjust the minutes.
4. Push the CLOCK button 1 again to exit the clock set mode.
The display will return to the regular clock display after 5 seconds.
Radio operation

Radio (FM/AM) band select:
Pushing the FM·AM radio band select button will change the band as follows:
AM  FM1
FM2
AM
FM1
FM2
AM
When the stereo broadcast signal is weak, the radio will automatically change from stereo to monaural reception.
When the radio band select button is pushed while the ignition switch is in the ACC or ON position, the radio will come on at the station last played.

TUNE (Tuning):
Push the TUNE button  or
or
 for manual tuning. To move quickly
through the stations, push and hold the TUNE button.
for manual tuning. To move quickly
through the stations, push and hold the TUNE button.

SEEK tuning:
Push the SEEK button  or
or
 to tune from low to high or high to
low frequencies and to stop at the next broadcasting station.
to tune from low to high or high to
low frequencies and to stop at the next broadcasting station.

SCAN tuning:
Push the SCAN button to tune from low to high frequencies and stops at each broadcasting station for 5 seconds. Pushing the button again during this 5 seconds period will stop SCAN tuning and the radio will remain tuned to that station.
If the SCAN tuning button is not pushed within 5 seconds, SCAN tuning moves to the next station.
1 to 6 Station memory operations:
12 stations can be set for the FM band (6 each for FM1 and FM2), and 6 can be set for the AM band for easy access.
1. Choose the radio band using the radio band select button.
2. Tune to the desired station using the SEEK, SCAN or TUNE button.
3. Push and hold the desired radio station preset button 1 to 6 until a beep sound is heard. (The radio mutes when the radio station preset button is pushed.) 4. The station indicator will then come on and the sound will resume. Memorizing is now complete.
5. Other buttons can be set in the same manner.
If the battery cable is disconnected, or if the fuse opens, the radio memory will be erased. In that case, reset the desired stations.
Radio Data System (RDS):
RDS stands for Radio Data System, and is a data information service transmitted by some radio stations on the FM band (not AM band) encoded within a regular radio broadcast.
Currently, most RDS stations are in large cities, but many stations are now considering broadcasting RDS data.
RDS can display:
- Station call sign, such as “WHFR 98.3”.
- Station name, such as “The Groove”.
- Music or programming type such as “Classical”, “Country” or “Rock”.
- Traffic reports about delays or construction.
If the station broadcasts RDS information, the RDS icon is displayed.

RADIO DISPLAY change:
When the DISP button is pushed during the FM radio mode, the radio display will change in the following order.
FM radio:
Frequency ↔ PS (Programme Service)/PTY (Programme type) In the FM radio mode, pushing
the DISP button will switch the frequency display to the PTY display (if available),
and if the DISP button is not pushed again within 5 seconds, it will automatically
switch to the PS display. If PTY is not available, pressing the DISP button will
only switch between the frequency display and the PS display.
Compact Disc (CD) player operation
Place the ignition switch in the ACC or ON position, and insert the CD into the slot with the label side facing up. The CD will be guided automatically into the slot and start playing.
After loading the disc, the number of tracks on the disc will appear on the display.
If the radio is already operating, it will automatically turn off and the CD will play.
If the system has been turned off while the CD was playing, pushing the PWR button will start the CD.
Do not use 3.1 in (8 cm) discs.

CD PLAY:
When the CD button is pushed with the system off and the CD loaded, the system will turn on and the CD will start to play.
When the CD button is pushed with the CD loaded and the radio playing, the radio will automatically be turned off and the CD will start to play.

CD play information:
When the DISP button is pushed for less than 1.5 seconds while the CD is being played, the disc information display will change as follows:
CD:

CD with MP3 or WMA:


FF (Fast Forward), REW (Rewind):
CD:
When the  or
or
 button is pushed while the CD is being
played, the CD will play while fast forwarding or rewinding. When the button is
released, the CD will return to normal play speed.
button is pushed while the CD is being
played, the CD will play while fast forwarding or rewinding. When the button is
released, the CD will return to normal play speed.
CD with MP3 or WMA:
When the  or
or
 button is pushed for less than 1.5
seconds while the CD is being played, the folders in the CD will change.
button is pushed for less than 1.5
seconds while the CD is being played, the folders in the CD will change.
When the  or
or
 button is pushed for more than 1.5
seconds while the CD is being played, the CD will play while forwarding or rewinding.
button is pushed for more than 1.5
seconds while the CD is being played, the CD will play while forwarding or rewinding.
When the button is released, the CD will return to the normal play speed.

APS (Automatic Program Search) FF, APS REW:
When the  button is pushed while
the CD is being played, the program next to the present one will start to play from
its beginning. Push several times to skip through programs. The CD will advance
the number of times the button is pushed. (When the last program on the CD is skipped
through, the first program will be played.) When the
button is pushed while
the CD is being played, the program next to the present one will start to play from
its beginning. Push several times to skip through programs. The CD will advance
the number of times the button is pushed. (When the last program on the CD is skipped
through, the first program will be played.) When the
 button is pushed, the program being
played returns to its beginning. Push several times to skip back through programs.
button is pushed, the program being
played returns to its beginning. Push several times to skip back through programs.
The CD will go back the number of times the button is pushed.

SCAN tuning:
When the SCAN tuning button is pushed for more than 1.5 seconds while the CD is being played, the beginning of all the tracks of CD will be played for 10 seconds in sequence.
Pushing the button again during this 10 second period will stop SCAN tuning.
If the SCAN tuning button is not pushed within 10 seconds, SCAN tuning moves to the next disc program.

When the RPT button is pushed for less than 1.5 seconds while the CD is being
played, the play pattern can be changed as follows:
CD:

CD with MP3 or WMA:


CD EJECT:
When the CD EJECT button is pushed with the CD loaded, the CD will be ejected.
When this button is pushed while the CD is being played, the CD will come out and the system will turn off.
If the CD comes out and is not removed, it will be pulled back into the slot to protect it.
Interface system for iPod® operation
Interface system for iPod® operation
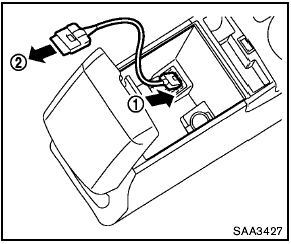
Connecting iPod®:
The iPod® outlet connector is located in the center console. Connect the cable 1 as illustrated, and then connect the other end of the cable to your iPod® 2 . Your vehicle is equipped with the specialized cable for connecting the iPod® to your vehicle audio unit. The battery of your iPod® is charged while it is connected to the vehicle if the iPod® supports charging via a FireWire® connection.
When the connection is complete, a NISSAN logo will be displayed on the iPod® and an iPod® icon on the audio display illuminates. While connecting the iPod® to the vehicle, the iPod® can only be operated by the vehicle audio controls.
To disconnect the cable from the vehicle outlet, fully depress the center connector button to unlatch the connector and pull the connector straight out of the outlet. To disconnect the cable from the iPod®, fully depress the side connector buttons and pull the iPod® connector straight out of the iPod®.
* iPod®, iPhone® and FireWire® are a trademark of Apple Inc., registered in the U.S. and other countries.
Compatibility:
The following models are available:
- Fourth generation iPod® (Firmware version 3.1.1 or later)
- Fifth generation iPod® (Firmware version 1.1.2 or later)
- First generation iPod Classic® (Firmware version 1.3 or later)
- Second generation iPod Classic® (Firmware version 1.3 or later)
- First, second and third generation iPod touch® (Firmware version 3.1.0 or later)
- First and second generation iPod mini® (Firmware version 1.4.1 or later)
- iPod photo® (Firmware version 1.2 or later)
- First generation iPod nano® (Firmware version 1.3.1 or later)
- Second generation iPod nano® (Firmware version 1.1.3 or later)
- Third generation iPod nano® (Firmware version 1.2 or later)
- iPhone® (Firmware version 3.1 or later)
- iPhone® 3G (Firmware version 3.1 or later)
- iPhone® 3GS (Firmware version 3.1 or later)
The fourth and fifth generation iPod nano , iPod touch®, the second generation iPod Classic® and iPhone® 3G may not work with the system in some cases.
Make sure that your iPod® firmware is updated.
* 12V-charge iPod®s are not chargeable with this system.

iPod® button:
Place the ignition switch in the ACC or ON position. Then, push the iPod® button to switch to the iPod® mode.
If another audio source is playing and the iPod® is connected, pushing the iPod® button changes to the iPod® mode.
If the system has been turned off while the iPod® was playing, pushing the PWR button will start the iPod®.

Top menu item selecting:
When the iPod® MENU button is pushed while the iPod® is connected, the interface
for iPod® operation is shown on the audio display. The items on the menu list can
be scrolled by pushing the SEEK button
 or
or
 and the TUNE button
 or
or
 while the iPod® is operational. To
select an item, push ENTER. The display can be changed as follows:
while the iPod® is operational. To
select an item, push ENTER. The display can be changed as follows:

For more information about each item, see the iPod® Owner’s Manual.

ENTER, BACK button:
- When the ENTER button is pushed while the top menu is displayed, program details are shown on the audio display.
- To select the program, push to search using the SEEK
 or
or
 and ENTER button.
- When the BACK button is pushed, it returns to the previous display.

iPod® play information:
When the DISP button is pushed while a program is being played, the program information display will change as follows:

* Artist Name will not be displayed for a Podcast.

FF (Fast Forward), REW (Rewind) button:
When the  or
or
 button is pushed for more than 1.5
seconds while the iPod® is playing, the iPod® will play while fast forwarding or
rewinding.
button is pushed for more than 1.5
seconds while the iPod® is playing, the iPod® will play while fast forwarding or
rewinding.
When the button is released, the iPod® will return to the normal play speed.
When the  or
or
 button is pushed for less than 1.5
seconds while the iPod® is playing, the next track or the beginning of the current
track on the iPod® will be played.
button is pushed for less than 1.5
seconds while the iPod® is playing, the next track or the beginning of the current
track on the iPod® will be played.

APS (Automatic Program Search) FF, APS REW button:
When the or
button is pushed for more than 1.5
seconds while the iPod® is playing, numbers of tracks can be skipped through.
When the or
button is pushed for less than 1.5
seconds while iPod® is playing, the next track or the beginning of the current track
on the iPod® will be played.

REPEAT (RPT), RANDOM (RDM):
When the RPT button is pushed while a track is
being played, the play pattern can be changed as follows:
Except Podcast and Audiobook:

Podcast:
ALL REPEAT ↔ TRACK REPEAT
Audiobook:

AUX (Auxiliary) input
AUX IN jack:
The AUX IN jack is located on the audio unit.
The AUX IN audio input jack accepts any standard analog audio input such as from a portable cassette tape/CD player, MP3 player or laptop computer.

AUX (Auxiliary) button:
With an AUX device plugged in, push the AUX button repeatedly until the display changes to the AUX mode.
When the AUX button is pushed with no device plugged into the jack, the audio system does not change to the AUX mode.
NISSAN strongly recommends using a stereo mini plug cable when connecting your music device to the audio system. Music may not play properly when a monaural cable is used.
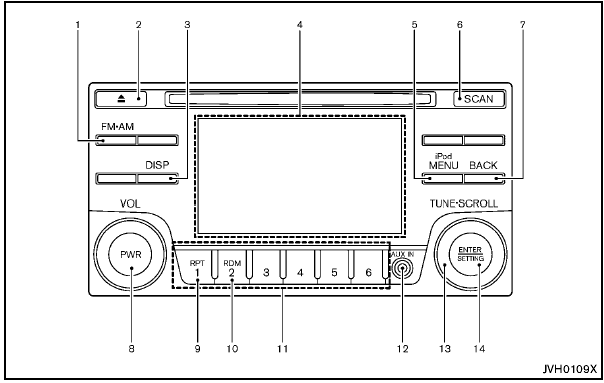
FM-AM-SAT(if so equipped) radio with Compact Disc (CD) player (Type A)
FM-AM-SAT(if so equipped) radio with Compact Disc (CD) player (Type A)
1. FM·AM band select button
2. CD EJECT button
3. DISP (display) button
4. Color display
5. iPod® MENU button
6. Radio SCAN tuning button
7. BACK button
8. PWR (power) button/VOL (volume) control knob
9. RPT (repeat) play button
10. RDM (random) play button
11. Radio station preset select buttons
12. AUX IN jack
13. TUNE·SCROLL control knob
14. ENTER/SETTING button
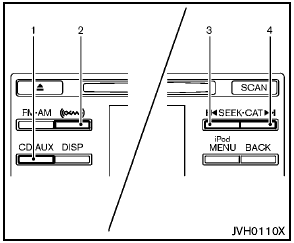
models with satellite radio
1. CD·AUX button
2. XM band select button
3. Radio CAT (category)/REW (rewind) button for SEEK/TRACK
4. Radio CAT (category)/FF (fast forward) button for SEEK/TRACK
models without satellite radio
1. AUX button
2. CD button
3. REW (rewind) button for SEEK/TRACK
4. FF (fast forward) button for SEEK/TRACK
For all operation precautions, see “Audio operation precautions” earlier in this section.
For models with satellite radio:
- No satellite radio reception is available when the SAT band option is selected
unless the optional satellite receiver and antenna are installed, and there is an
active XM Satellite Radio subscription.
- The satellite radio mode requires an active XM Satellite Radio subscription. The satellite radio is not available in Alaska, Hawaii and Guam.
- It may take some time to receive the activation signal after subscribing the XM Satellite Radio. After receiving the activation signal, an available channel list will be automatically updated in the radio. For XM, place the ignition switch from LOCK to ACC to update the channel list.
Audio main operation
Head unit:
The auto loudness circuit enhances the low and high frequency ranges automatically in both radio reception and CD playback.
PWR/Volume control:
Place the ignition switch in the ACC or ON position, and then push the PWR button while the system is off to turn on the last audio source, which was playing immediately before the system was turned off. While the system is on, pushing the PWR button turns the system off.
Turn the VOL control knob to adjust the volume.

SETTING button:
The settings screen will appear when pushing the SETTING button.
The following items are available in the settings screen.
- Bass, Treble, Balance and Fade Controls the sound of the audio system.
Balance adjusts the sound between the left and right speakers. Fade adjusts the sound between the front and rear speakers.
Select the "Bass", "Treble", "Balance" or "Fade" using the TUNE·SCROLL control knob and then push the SETTING button.
Turn the TUNE·SCROLL control knob to adjust the Bass, Treble, balance and Fade of the screen to the preferred level.
- Speed Sens Vol.
To change the Speed Sensitive Volume (Speed Sens Vol.) level from off (0) to 5, turn the TUNE·SCROLL control knob.
- AUX Vol.
Controls the volume level of incoming sound when an auxiliary device is connected to the system. Choose a setting between 1 and 3 or choose 0 to disable the feature entirely.
- Brightness and Contrast Adjust the brightness and contrast of the screen.
Select the "brightness" or "contrast" using the TUNE·SCROLL control knob and
then push the SETTING button. Turn the TUNE
·SCROLL control knob to adjust the brightness and contrast of the screen to the
preferred level.
- Clock Adjust Adjust the clock according to the following procedure.
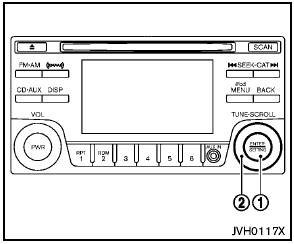
1) Push the SETTING button 1 until “Setting Clock” and “Clock Adjust” appear on the display.
2) Turn the TUNE·SCROLL control knob 2 to adjust the hour.
3) Push the SETTING button 1 .
4) Turn the TUNE·SCROLL control knob 2 to adjust the minute.
5) Push the SETTING button 1 .
- On-Screen Clock
When this item is turned on, a clock is always displayed in the upper right corner
of the screen.
Select the "On-Screen Clock" using the TUNE·SCROLL control knob and then push the SETTING button. You can toggle between ON and OFF using the TUNE·SCROLL control knob.
- RDS Display
When this has been set to ON, RDS (radio data system) information will be shown
on the display. Select RDS Display and then push the SETTING button. You can toggle
between ON and OFF using the TUNE·SCROLL control knob.
- iPod Menu language
The iPod menu language can be set to English, French or Spanish.
Select iPod menu language and then push the SETTING button. Use the TUNE·SCROLL control knob to select the preferred language.

DISP button:
Display of the screen can be canceled by pushing the DISP button. You can then listen to music that is being played back. If you want to display the screen again, either push the DISP button once more or push the FM·AM, XM or CD·AUX button.
Switching the display:
- Models with satellite radio
Pushing the CD·AUX button will switch the displays as follows:
CD  iPod®/USB
 AUX
AUX
 CD
CD
- Models without satellite radio
Pushing the AUX button will switch the displays as follows:
iPod®/USB  AUX
AUX
 iPod®/USB
FM-AM-SAT(if so equipped) radio operation

radio (FM/AM) band select:
Pushing the radio band select button will change the band as follows:
AM FM1
FM2
AM

radio (SAT) band select (models with satellite radio):
Pushing the XM band select button will change the band as follows:
XM1 XM2
XM3
XM1 When the XM band select button
is pushed while the ignition switch is in the ACC or ON position, the radio will
come on at the channel last played.
The last channel played will also come on when the PWR button is pushed to ON.
The satellite radio is not available in Alaska, Hawaii and Guam.
If another audio source is playing when the radio band select button is turned to ON, the audio source will automatically be turned off and the last radio channel played will come on.
When the stereo broadcast signal is weak, the radio will automatically change from stereo to monaural reception.
TUNE (Tuning):
- For AM and FM radio
Turn the radio TUNE·SCROLL control knob for manual tuning.
- For XM Satellite Radio
Turn the radio TUNE·SCROLL control knob to seek channels from all of the categories
when any category is not selected.

SEEK tuning/CAT (category) (models with satellite radio):
- For AM and FM radio
Push the SEEK button  or
or
 to tune from low to high or high to
low frequencies and to stop at the next broadcasting station.
to tune from low to high or high to
low frequencies and to stop at the next broadcasting station.
- For XM Satellite Radio
Push the SEEK button  or
or
 to tune to the first channel of the
next or previous category.
to tune to the first channel of the
next or previous category.

SCAN tuning:
Push the Radio SCAN tuning button to tune from low to high frequencies and stop at each broadcasting station/channel for 5 seconds.
Pushing the button again during this 5 seconds period will stop SCAN tuning and the radio will remain tuned to that station/channel.
If the Radio SCAN tuning button is not pushed within 5 seconds, SCAN tuning moves to the next station/channel.
1 to 6 Station memory operations:
12 stations/channels can be set for the FM band (6 each for FM1 and FM2), 12 for XM radio (6 each for XM1 and XM2) (if so equipped) and 6 stations can be set for the AM band.
1. Choose the radio band using the radio band select button.
2. Tune to the desired station/channel using the SEEK·CAT (models with satellite radio), SEEK·TRACK (models without satellite radio), SCAN button or the radio TUNE·SCROLL control knob.
3. Push and hold the desired station preset button 1 to 6 until the radio mutes.
4. The station indicator will then come on and the sound will resume. Memorizing is now complete.
5. Other buttons can be set in the same manner.
If the battery cable is disconnected, or if the fuse opens, the radio memory will be erased. In that case, reset the desired stations/channels.
Compact Disc (CD) player operation
Place the ignition switch in the ACC or ON position and insert the Compact Disc (CD) into the slot with the label side facing up. The CD will be guided automatically into the slot and start playing.
After loading the CD, the number of tracks on the CD and the play time will appear on the display.
If the radio is already operating, it will automatically turn off and the CD will play.
If the system has been turned off while the CD was playing, pushing the PWR button will start the CD.
Do not use 3.1 in (8 cm) discs.
 (models with satellite radio)
 (models without satellite radio)PLAY:
When the CD·AUX or CD button is pushed with the system off and the CD loaded, the system will turn on and the CD will start to play.
When the CD·AUX or CD button is pushed with the CD loaded and the radio playing, the radio will automatically be turned off and the CD will start to play.

Next/Previous Track and Fast Forward/Rewind:
When the FF or REW button is pushed for more than 1.5 seconds while the CD is being played, the CD will play while fast forwarding or rewinding. When the button is released, the CD will return to normal play speed.
When the FF or REW button is pushed for less than 1.5 seconds while the CD is being played, the next track or the beginning of the current track on the CD will be played.

REPEAT (RPT):
When the RPT play button is pushed while the CD is played, the play pattern can
be changed as follows:
(CD)
Normal  1 Track Repeat
(CD with compressed audio files)
Normal  1 Folder Repeat
 1 Track Repeat
 Normal

RANDOM (RDM):
When the RDM play button is pushed while a CD is being played, the play pattern
can be changed as follows:
(CD) Normal 1 Disc Random (CD with
compressed audio files) Normal 1 Disc
Random 1 Folder Random
Normal

CD EJECT:
When the CD EJECT button is pushed with the CD loaded, the CD will be ejected.
When this button is pushed while the CD is being played, the CD will be ejected.
If the CD comes out and is not removed, it will be pulled back into the slot to protect it.
AUX (Auxiliary) input
AUX IN jack:
The AUX IN jack is located on the audio unit.
The AUX IN audio input jack accepts any standard analog audio input such as from a portable cassette tape/CD player, MP3 player or laptop computer.

CD·AUX (models with satellite radio) AUX (models without satellite radio) button:
When the AUX button is pushed with no device plugged into the jack, the audio system does not change to the AUX mode.
NISSAN strongly recommends using a stereo mini plug cable when connecting your music device to the audio system. Music may not play properly when a monaural cable is used.
USB memory operation
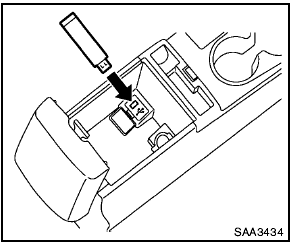
Audio main operation:
The USB outlet connector is located in the center console. Open the lid and connect a USB memory as illustrated. Then, switch to the USB memory mode automatically.
If the system has been turned off while the USB memory was playing, pushing the PWR button will start the USB memory.
 (models with satellite radio)
 (models without satellite radio)
PLAY:
(models without satellite radio)
PLAY:
When the AUX button is pushed with the system off and the USB memory inserted, the system will turn on.
If another audio source is playing and a USB memory is inserted, push the AUX button repeatedly until the center display changes to the USB memory mode.

Next/Previous File and Fast Forward/Rewind:
When the FF or REW button is pushed for more than 1.5 seconds while a USB memory is being played, the USB memory will play while forwarding or rewinding. When the button is released, the USB memory will return to normal play speed.
When the FF or REW button is pushed for less than 1.5 seconds while the USB memory is being played, the next track or the beginning of the current track on the USB memory will be played.
The multi-function controller can also be used to select tracks when the USB memory is being played.
Folder selection:
To change to another folder in the USB memory, turn the folder selector or choose a folder displayed on the screen using the multi-function controller.

REPEAT (RPT):
When the RPT button is pushed while the USB memory is played, the play pattern can be change as follows.
To change the play mode, push the RPT button repeatedly and the mode will change as follows.
Normal  1 Folder Repeat
 1 Track Repeat
 Normal

RANDOM (RDM):
When the RDM button is pushed while a USB memory is being played, the play pattern can be changed as follows.
To change the play mode, push the RDM button repeatedly, and the mode will change as follows.
Normal  All Random
 1 Folder Random
 Normal

BACK button:
When the BACK button is pushed, it returns to the previous display.
iPod® player operation
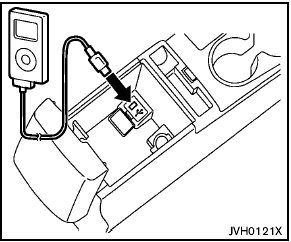
Connecting iPod®:
The USB outlet connector is located in the center console. Open the lid and connect the iPod® cable to the USB connector. The battery of the iPod® is charged while the connection to the vehicle.
Depending on the version of the iPod®, the display on the iPod® shows a NISSAN or Accessory Attached screen when the connection is completed. When the iPod® is connected to the vehicle, the iPod® music library can only be operated by the vehicle audio controls.
* iPod® and iPhone® are a trademark of Apple Inc., registered in the U.S. and other countries.
Compatibility:
The following models are available:
- Third generation iPhone® (Firmware version IOS4/4.0)
- Fourth generation iPhone® (Firmware version IOS4/4.0)
- Fifth generation iPod® (Firmware version 1.3)
- First generation iPod Classic® (Firmware version 1.1.1 or 1.1.2PC)
- Second generation iPod Classic® (Firmware version 2.0.1)
- First generation iPod touch® (Firmware version 1.1.5 or 2.2.1)
- Second and third generation iPod touch® (Firmware version 2.2.1 or IOS4/4.0.0)
- First generation iPod nano® (Firmware version 1.3.1)
- Second generation iPod nano® (Firmware version 1.1.3)
- Third generation iPod nano® (Firmware version 1.1.2PC or 1.1.3PC)
- Fourth generation iPod nano® (Firmware version 1.0.2 or 1.0.4)
- Fifth generation iPod nano® (Firmware version 1.0.1 or 1.0.2)
The iPod touch® may not response quickly with the system in some cases.
Make sure that the iPod® firmware is updated.
Audio main operation:
Place the ignition switch to the ACC or ON position. Then, push the CD·AUX button repeatedly to switch to the iPod® mode.
If the system has been turned off while the iPod® was playing, pushing the PWR button will start the iPod®.

iPod® MENU button:
Place the ignition switch in the ACC or ON position. Then, push the iPod® button to switch to the iPod® mode.
If another audio source is playing and the iPod® is connected, pushing the iPod® button changes to the iPod® mode.
If the system has been turned off while the iPod® was playing, pushing the PWR button will start the iPod®.
When the iPod® MENU button is pushed while the iPod® is connected, the interface for iPod® operation is shown on the audio display. The items on the menu list can be scrolled by pushing the or while the iPod® is operational. To select an item, push ENTER.
Items in the iPod menu appear on the display in the following order.
- Now playing
- Playlists
- Artists
- Albums
- songs
- Podcasts
- Genres
- Composers
- Audiobooks
- Shuffle songs
For more information about each item, see the iPod® Owner’s Manual.

Next/Previous Track and Fast Forward/Rewind:
When the FF or REW button is pushed for more than 1.5 seconds while the iPod® is playing, the iPod® will play while fast forwarding or rewinding.
When the button is released, the iPod® will return to the normal play speed.
When the FF or REW button is pushed for less than 1.5 seconds while the iPod® is playing, the next track or the beginning of the current track on the iPod® will be played.
The multi-function controller can also be used to select tracks when the iPod® is playing.

REPEAT (RPT):
When the RPT play button is pushed while a track is being played, the play pattern
can be changed as follows:
Repeat Off 1 Track Repeat
All Repeat
Repeat Off

Random (RDM):
When the RDM play button is pushed while a track is being played, the play pattern
can be changed as follows:
Shuffle Off Track Shuffle
Albums Shuffle
Shuffle Off

BACK button:
When the BACK button is pushed, it returns to the previous display.
FM-AM-SAT radio with Compact Disc (CD) player (Type B)
FM-AM-SAT radio with Compact Disc (CD) player (Type B)
1. XM band select button
2. CD insert slot
3. CD EJECT button
4. TUNE/SCROLL and AUDIO control knob
5. Radio station preset buttons
6. AUX button
7. ON·OFF/VOLUME control knob
8. FF (forward)/REW (rewind) or SEEK/CATEGORY button
9. CD button
10. FM·AM band select button
No satellite radio reception is available unless an
XM Satellite Radio subscription is active.
For all operation precautions, see “Audio operation precautions” earlier in this section.
The satellite radio mode requires an active XM Satellite Radio subscription. The satellite radio is not available in Alaska, Hawaii and Guam.
It may take some time to receive the activation signal after subscribing the XM Satellite Radio.
After receiving the activation signal, an available channel list will be automatically updated in the radio. For XM, place the ignition switch from LOCK to ACC to update the channel list.
Audio main operation
Head unit:
The auto loudness circuit enhances the low and high frequency ranges automatically in both radio reception and CD playback.
ON·OFF/Volume control:
Place the ignition switch in the ACC or ON position, and then push the ON·OFF button while the system is off to turn on the last audio source, which was playing immediately before the system was turned off. While the system is on, pushing the ON·OFF button turns the system off.
Turn the VOL control knob to adjust the volume.
Adjusting tone quality and speaker balance:
To adjust Bass, Treble, Balance and Fade, push the Audio control knob. When the display shows the setting you want to change (Bass, Treble, Balance and Fade), rotate the Audio control knob to set the desired setting. For the other setting methods, see “How to use touch screen” earlier in this section.
This vehicle has some sound effect functions as follows:
- Speed Volume
For more details, see “How to use the setup button” earlier in this section.
Adjusting AUX level:
The volume level of incoming sound can be selected from “Quiet”, “Medium” and “Loud” when an auxiliary device is connected to the system. For more details, see “How to use the setup button” earlier in this section.
Switching the display:
Pushing the AUX button will switch the displays between USB/iPod® and AUX.
FM-AM-SAT radio operation
When the radio band select button is pushed while the ignition switch is in the ACC or ON position, the radio will come on at the channel last played.
The last channel played will also come on when the ON·OFF button is pushed to ON.
If another audio source is playing when the radio band select button is turned to ON, the audio source will automatically be turned off and the last radio channel played will come on.
When the stereo broadcast signal is weak, the radio will automatically change from stereo to monaural reception.

FM·AM radio band select:
Pushing the FM·AM radio band select button will change the band as follows:
AM FM1
FM2
AM

XM radio band select:
Pushing the XM radio band select button will change the band as follows:
XM1 XM2
XM3
XM1
The satellite radio is not available in Alaska, Hawaii and Guam.
TUNE (Tuning):
- For AM and FM radio
Turn the TUNE knob for manual tuning.
- For XM Satellite Radio
Turn the TUNE knob to seek channels from all of the categories when any category
is not selected.

SEEK tuning: Headlight and turn signal switch Driving the vehicle Head restraintsSee also:
Xenon headlights (if so equipped)
HIGH VOLTAGE
- When xenon headlights are on, they produce a high voltage. To prevent an
electric shock, never attempt to modify or disassemble. Always have you ...
CONTINUOUSLY VARIABLE TRANSMISSION
(CVT)
The Continuously Variable Transmission (CVT)
in your vehicle is electronically controlled to
produce maximum power and smooth operation.
The recommended ...
WARNING
Head restraints supplement the other
vehicle safety systems. They may provide
additional protection against injury
in certain rear end collisions. Adjust the
head restraints properly, as ...