How to use SETTING button
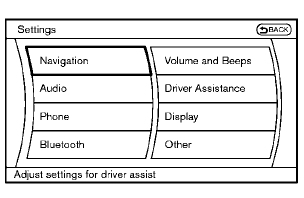
Models with navigation system
Models without navigation system
The display as illustrated will appear when the SETTING button is pushed.
Items displayed on the screen may vary depending on the model.
For navigation settings, refer to the separate Navigation System Owner’s Manual.
Models with navigation system
Models without navigation system
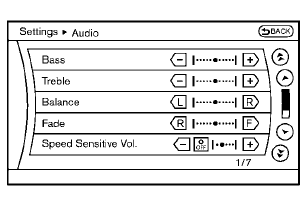
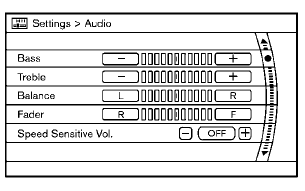
Audio settings
The display as illustrated will appear when pushing the SETTING button and selecting the “Audio” key.
Bass/Treble/Balance/Fade:
To adjust the speaker tone quality and sound balance, select the “Bass”, “Treble”, “Balance” or “Fade” key and adjust it with the multifunction controller.
These items can also be adjusted by pushing and turning the AUDIO knob.
Speed Sensitive Vol.:
The audio system’s volume is increased with the vehicle speed. Select the “Speed Sensitive Vol.” and adjust the effect level with the multi-function controller. The Speed Sensitive Volume function is turned off when the level is set to “OFF”.
Increasing the value will cause the volume to increase faster with vehicle speed.
DivX® Registration Code (models with navigation system):
The registration code for a device that is used to download DivX® files will be displayed on the screen. If a disc is loaded or a USB memory is connected to the audio system, this function will not be activated.
Display Album Cover Art (models with navigation system):
When this item is turned to ON, the album cover image is displayed when playing iPod® or MP3 music files through a CD, DVD or USB memory.
When the image is not properly embedded in the file or device, the image will not be displayed.
Phone settings (models with navigation system)
For details of the “Phone” settings, see “Bluetooth ® Hands-Free Phone System (models with navigation system)” later in this section.
Bluetooth® settings (models with navigation system)
For details of the “Bluetooth” settings, see “Bluetooth® Hands-Free Phone System (models with navigation system)” later in this section or “Bluetooth® streaming audio (models with navigation system)” later in this section.
Example
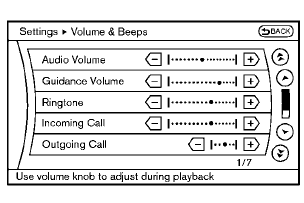
Volume and Beeps settings (models with navigation system) The display as illustrated will appear when pushing the SETTING button, selecting the “Volume & Beeps” key.
Audio Volume:
To increase or decrease the audio volume, select the “Audio Volume” and adjust it with the multi-function controller. You can also adjust the audio volume by turning the VOLUME control knob.
Guidance Volume:
To adjust the guidance voice volume, select the “Guidance Volume” and adjust it with the multifunction controller.
You can also adjust the guidance voice volume by turning the VOLUME control knob while voice guidance is being announced.
Ringtone/Incoming Call/Outgoing Call:
For the details of these items, see “Bluetooth® Hands-Free Phone System (models with navigation system)” later in this section.
Switch Beeps:
When this item is turned to ON, you will hear a beep sound when you use a button.
Guidance Voice:
When this item is turned to ON, you will hear voice guidance in the navigation operation or in other operations.
NOTE:
When the voice guidance is being announced during audio playback, turning the volume knob does not adjust the music level; it adjusts the guidance volume level.
If voice guidance is not being heard, please check the Guidance Volume level.
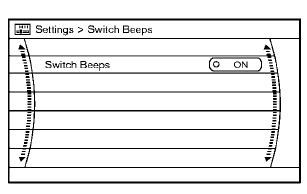
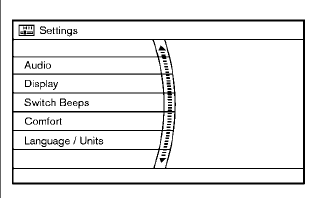
Switch Beeps settings (models without navigation system)
The “Switch Beeps” screen will appear when pushing the SETTING button, selecting the “Switch Beeps” key with the multi-function controller and pushing the ENTER button.
Switch Beeps:
When this item is turned to ON, you will hear a beep sound when you use a button.
Driver Assistance settings (if so equipped)
For the details of the “Driver Assistance” settings, see the following items:
• “BSW system operation” in the “5.
Starting
and driving” section.
• “LDW system operation” in the “5. Starting
and driving” section.
• “Moving Object Detection (MOD) function”
later in this section.
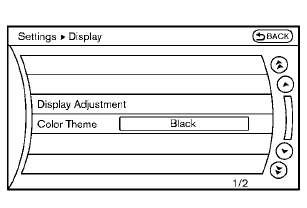
Display settings (models with navigation system)
The display as illustrated will appear when pushing the SETTING button and selecting the “Display” key.
Display Adjustment:
To adjust the display settings, select the “Display Adjustment” key. The following settings are available.
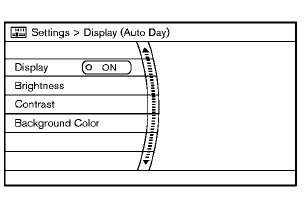
• Display
To turn off the screen, push the ENTER button
and turn the “Display” indicator off. The other
method is to push and hold the “ OFF”
button for more than 2 seconds.
OFF”
button for more than 2 seconds.
When any mode button is pushed with the screen off, the screen turns on for further operation. The screen will turn off automatically 5 seconds after the operation is finished.
To turn on the screen, set this item to the ON
position, or push and hold the “
OFF”
button.
• Brightness/Contrast/Background Color
To adjust the brightness and contrast of the
screen, select the “Brightness” or “Contrast”
key.
Then, you can adjust the brightness and the contrast using the multi-function controller.
For information on the “Background Color” key, refer to the separate Navigation System Owner’s Manual.
For CrossCabriolet models: Depending on the driver’s seat position, the display could be hard to read. Adjust the brightness and contrast of the display on the setting screen.
Color Theme:
Choose the theme color of the menu screen from “Black”, “Blue” or “Red”.
Display settings (models without navigation system) The “Display” screen will appear when pushing the SETTING button on the control panel.
Display:
To turn off the screen, push the ENTER button and turn the “ON” indicator off.
When any mode button is pushed with the screen off, the screen turns on for further operation. The screen will turn off automatically 5 seconds after the operation is finished.
To turn on the screen, set this item to the “ON”
position or push the “ OFF” button.
Brightness/Contrast/Background Color:
To adjust the brightness, contrast and background color of the screen, select the appropriate “Brightness”, “Contrast” or “Background Color” key and push the ENTER button.
You can then adjust the brightness and contrast using the multi-function controller. Switch the background color to the daytime mode or the nighttime mode by pushing the ENTER button.

Others settings (models with navigation system)
The Others settings display will appear when pushing the SETTING button and selecting the “Others” key.
The following items are available:
• Comfort
• Clock
• Language & Units
• Voice Recognition
• Camera
• Image Viewer
Models with navigation system
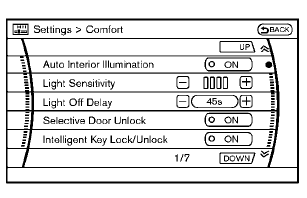
Comfort settings
The display as illustrated will appear when pushing the SETTING button, selecting the “Others” key and then selecting the “Comfort” key. This key does not appear on the display until the ignition switch is pushed to the ON position.
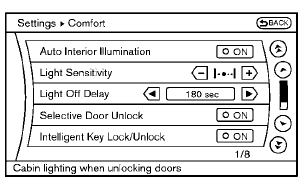
Models without navigation system
The display as illustrated will appear when pushing the SETTING button and selecting the “Comfort” key. This key does not appear on the display until the ignition switch is pushed to the ON position.
Auto Interior Illumination:
When this item is turned to ON, the interior lights will illuminate if any door is unlocked.
Light Sensitivity:
Adjust the sensitivity of the automatic headlights higher (right) or lower (left).
Lift Steering Wheel on Exit (if so equipped):
When this item is turned to ON, the steering wheel moves upward for easy exit if the ignition switch is in the LOCK position and the driver’s door is opened. After getting into the vehicle and pushing the ignition switch to the ACC position, the steering wheel moves to the previous position.
Slide Driver Seat Back on Exit (if so equipped):
When this item is turned to ON, the driver’s seat moves backward for easy exit if the ignition switch is in the OFF position and the driver’s door is opened. After getting into the vehicle and pushing the ignition switch to the ACC position, the driver’s seat moves to the previous position.
Light Off Delay:
Choose the duration of the automatic headlight off timer from 0, 30, 45, 60, 90, 120, 150 and 180 second periods.
Selective Door Unlock:
When this item is turned to ON, only the driver’s door is unlocked first after the door unlock operation. When the door handle request switch on the driver’s or front passenger’s side door is pushed to be unlocked, only the corresponding door is unlocked first. All the doors can be unlocked if the door unlock operation is performed again within 60 seconds.
When this item is turned to OFF, all the doors will be unlocked after the door unlock operation is performed once.
Intelligent Key Lock/Unlock:
When this item is turned to ON, door lock/ unlock function by pushing the door handle request switch will be activated.
Return All Settings to Default:
Select this item and then select “YES” to return all settings to the default.
Clock settings
The clock settings display cannot be operated while driving. Stop the vehicle in a safe place and apply the parking brake before setting the clock.
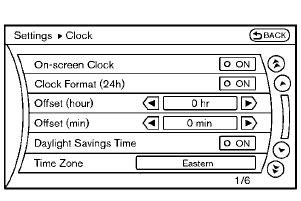
Models with navigation system
The display as illustrated will appear when pushing the SETTING button and selecting the “Others” key, and then selecting the “Clock” key.
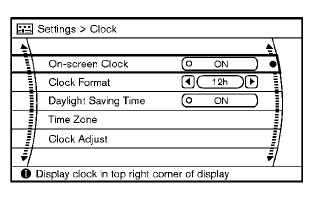
Models without navigation system
The display as illustrated will appear when pushing the SETTING button and selecting the “Clock” key.
On-screen Clock:
When this item is turned to ON, a clock is always displayed in the upper right corner of the screen.
This clock will indicate the time almost exactly because it is always adjusted by the GPS system (models with navigation system).
Clock Format (24h):
When this item is turned to ON, the 24-hour clock is displayed. When this item is not turned to ON, the 12-hour clock is displayed.
Offset (hour)/(min) (models with navigation system)/Clock Adjust (models without navigation system):
Adjust the time by increasing or decreasing per hour or per minute.
Daylight Saving Time:
Turn this item to ON for daylight saving time application.
Time Zone:
Choose the time zone from the following
Models with navigation system
• Pacific
• Mountain
• Central
• Eastern
• Atlantic
• Newfoundland
• Hawaii
• Alaska
Models without navigation system
• Eniwetok, Kwajalein
• Midway Island, Samoa
• Hawaii
• Alaska
• Pacific
Models with navigation system
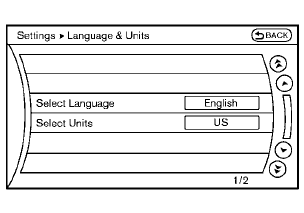
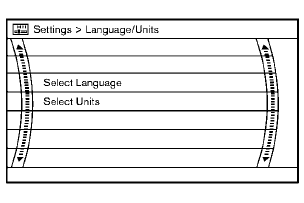
Language & Units settings
The Language & Units settings display will appear when pushing the SETTING button, selecting the “Others” key, and then selecting the “Language & Units” key.
Models without navigation system
The display illustrated will appear when pushing the SETTING button and selecting the “Language & Units” key.
Select Language:
Select the “Select Language” key. Choose “English”, “Franc¸ ais” or “Espan˜ ol” for your favorite display appearance.
If you select the “Franc¸ ais” key, the French language will be displayed, so please use the French Owner’s Manual. To obtain a French Owner’s Manual, see “Owner’s Manual/Service Manual order information” in the “9. Technical and consumer information” section.
Select Units:
Select the “Select Units” key. Choose “US” (Mile, 8F, MPG) or “Metric” (km, 8C, L/100 km) for your favorite display appearance.
Voice Recognition settings (models with navigation system) For details about the “Voice Recognition” settings, see “NISSAN voice recognition system (models with navigation system)” later in this section.
CAMERA settings (if so equipped)
The “CAMERA” screen will appear when selecting the “Camera” key.
For the details about the camera system operation, see “RearView monitor” later in this section.
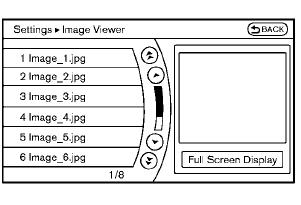
Image Viewer (models with navigation system)
The image files in the USB memory will be displayed. To display the Image Viewer, push the SETTING button, select the “Other” key and then select the “Image Viewer” key. The image of the selected file is displayed on the right side of the screen.
When a number of folders are included in the USB memory, select a folder from the list to display the file list.
Images will not be shown on the display while the vehicle is in any drive position to reduce driver distraction. To view images, stop the vehicle in a safe location and apply the parking brake.
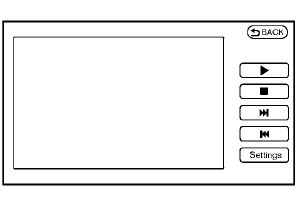
Full Screen Display:
The full screen display will appear when selecting the “Full Screen Display” key.
To operate the Image Viewer or to change the settings, select the desired key using the multifunction controller.
•
 (Start)
Select the “ ” key to start playing
the
slideshow.
” key to start playing
the
slideshow.
•
 (Stop)
Select the “  ” key to stop the
slideshow.
” key to stop the
slideshow.
•
 (Next)
Select the “ ” key to display the
next file.
” key to display the
next file.
•
 (Previous)
Select the “  ” key to display the
previous
file.
” key to display the
previous
file.
Setting the Image Viewer:
The Image Viewer setting display will appear when selecting the “Settings” key on the full screen display. The following settings are available for the full screen display.
• Slideshow Speed
Select the “Slideshow Speed” key. From the
following display, select the changing time
from 5, 10, 30, 60 seconds or “No Auto
Change”.
• Slideshow Order
Select the “Slideshow Order” key. From the
following display, select “Random” or “Order
List”. For “Order List”, the image order is the
order of the files as stored on the USB
memory.
Operating tips:
• Only files that meet the following conditions will be displayed.
— Image type: JPEG
— File Extensions: *.jpg, *jpeg
— Maximum Resolution: 2048 6 1536
pixels
— Maximum Size: 2-MB
— Colors: 32768 (15-bit)
— Maximum File Name lengths: 253-Bytes
— Maximum Folders: 500
— Maximum Images per Folder: 1024
• If an electronic device (such as a
digital
camera) is directly connected to the vehicle
using a USB cable, no image will be
displayed on the screen.
• If the file name is too long, some file
names
may not be entirely displayed.
• When the total number of characters in the
file name exceeds 100 or if 1 file name in a
directory exceeds 100 characters, all files
will show a shortened 8-character version.
The image will still be displayed when selected.
See also:
Booster seats
Precautions on booster seats
WARNING
If a booster seat and seat belt are not used
properly, the risk of a child being injured
in a sudden stop or collision greatly
increases:
– Make sure the s ...
Camera aiding sonar (parking sensor)
The sonar (parking sensor) sounds a tone to
inform the driver of obstacles near the bumper.
The colors of the sonar indicators and the distance
guide lines in the front, front-wide, rear and
r ...
Reprogramming a single HomeLink® button
To reprogram a HomeLink® Universal Transceiver
button, complete the following.
1. Press and hold the desired HomeLink®
button. DO NOT release the button.
2. The indicator light will begin to fla ...