RearView monitor (if so equipped)
When the selector lever is shifted into the R (Reverse) position, the monitor display shows the view to the rear of the vehicle.
The system is designed as an aid to the driver in detecting large stationary objects to help avoid damaging the vehicle. The system will not detect small objects below the bumper and may not detect objects close to the bumper or on the ground.

- The rear view camera is a convenience but it is not a substitute for proper backing up. Always turn and check that it is safe to do so before backing up. Always back up slowly.
- Objects viewed in the RearView Monitor differ from actual distance because a wide-angle lens is used.
Objects in the RearView Monitor will appear visually opposite than when viewed in the rear view and outside mirrors.
- Make sure that the lift gate is securely closed when backing up.
- Underneath the bumper and the corner areas of the bumper cannot be viewed on the RearView Monitor because of its monitoring range limitation.
- Do not put anything on the rear view camera.
- When washing the vehicle with high-pressure water, be sure not to spray it around the camera. Otherwise, water may enter the camera unit causing water condensation on the lens, a malfunction, fire or an electric shock.
- Do not strike the camera. It is a precision instrument. Otherwise, it may malfunction or cause damage resulting in a fire or an electric shock.

Do not scratch the camera lens when cleaning dirt or snow from the lens.
How to read the displayed lines
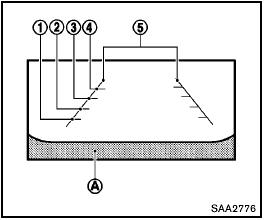
Guiding lines which indicate the vehicle width and distances to objects with reference to the bumper line A are displayed on the monitor.
Distance guide lines:
Indicate distances from the vehicle body.
- Red line 1 : approx. 1.5 ft (0.5 m)
- Yellow line 2 : approx. 3 ft (1 m)
- Green line 3 : approx. 7 ft (2 m)
- Green line 4 : approx. 10 ft (3 m)
Vehicle width guide lines 5 :
Indicate the vehicle width when backing up.
Difference between predicted and actual distances
The distance guide line and the vehicle width guide line should be used as a reference only when the vehicle is on a level, paved surface.
The distance viewed on the monitor is for reference only and may be different than the actual distance between the vehicle and displayed objects.
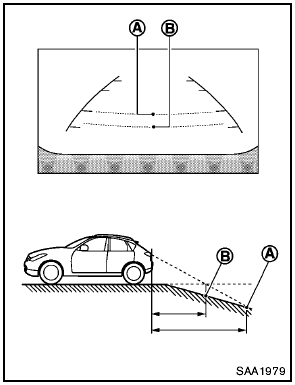
Backing up on a steep uphill
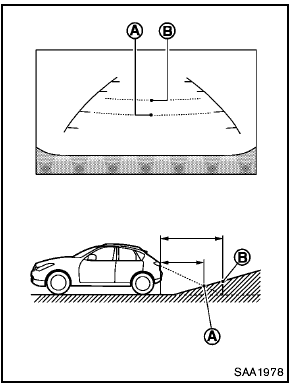
Backing up on a steep uphill
When backing up the vehicle up a hill, the distance guide lines and the vehicle width guide lines are shown closer than the actual distance.
For example, the display shows 3 ft (1.0 m) to the place A , but the actual 3 ft (1.0 m) distance on the hill is the place B . Note that any object on the hill is viewed in the monitor further than it appears.
Backing up near a projecting object
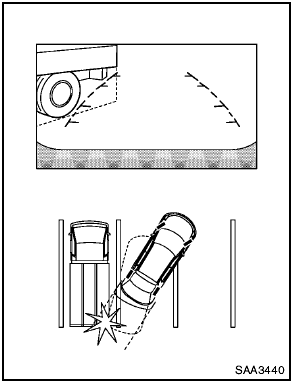
Backing up near a projecting object
The vehicle may seem to nearly clear the object in the display. However, the vehicle may hit the object if it projects over the actual backing up course.
Backing up behind a projecting object
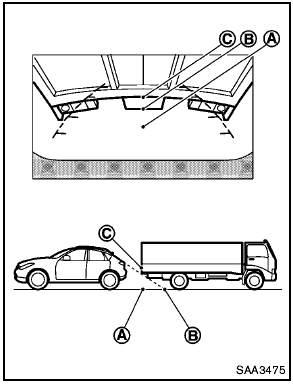
Backing up behind a projecting object
The position C is shown further than the position B in the display. However, the position C is actually at the same distance as the position A . The vehicle may hit the object when backing up to the position A if the object projects over the actual backing up course.
Backing up on a steep downhill
Backing up on a steep downhill
When backing up the vehicle down a hill, the distance guide lines and the vehicle width guide lines are shown further than the actual distance.
For example, the display shows 3 ft (1.0 m) to the place A , but the actual 3 ft (1.0 m) distance on the hill is the place B . Note that any object on the hill is viewed in the monitor closer than it appears.
How to adjust the screen (if so equipped)
To set up the RearView Monitor to your preferred settings, push the SETTING button while the RearView Monitor screen is displayed.
Each time the SETTING button is pushed, the next setting item is selected. Turn the TUNE·SCROLL control knob to adjust each item.
Available setting items:
- Brightness
- Contrast
- Tint
- Color
- Black Level
The setting items will disappear and the display will return to the original screen if SETTING button is pushed when the last setting item is selected or if the screen is left without operation for some time.
Operating tips
- When the selector lever is shifted to the R (Reverse) position, the monitor screen automatically changes to the RearView Monitor mode. However, the radio can be heard.
- It may take some time until the RearView Monitor or the normal screen is displayed after the selector lever has been shifted to R from another position or to another position from R. Objects may be distorted momentarily until the RearView Monitor screen is displayed completely.
- When the temperature is extremely high or low, the screen may not clearly display objects. This is not a malfunction.
- When strong light directly enters the camera, objects may not be displayed clearly.
This is not a malfunction.
- Vertical lines may be seen in objects on the screen. This is due to strong reflected light from the bumper. This is not a malfunction.
- The screen may flicker under fluorescent light. This is not a malfunction.
- The colors of objects on the RearView Monitor may differ somewhat from those of the actual object.
- Objects on the monitor may not be clear in a dark place or at night. This is not a malfunction.
- If dirt, rain or snow attaches to the camera, the RearView Monitor may not clearly display objects. Clean the camera.
- Do not use alcohol, benzine or thinner to clean the camera. This will cause discoloration.
To clean the camera, wipe with a cloth dampened with diluted mild cleaning agent and then wipe with a dry cloth.
- Do not damage the camera as the monitor screen may be adversely affected.
- Do not use wax on the camera window.
Wipe off any wax with a clean cloth dampened with mild detergent diluted with water.
See also:
Uniform tire quality grading
DOT (Department Of Transportation) Quality Grades: All passenger car tires must
conform to federal safety requirements in addition to these grades.
Quality grades can be found where applicable on t ...
Windshield wiper blades
Cleaning
If your windshield is not clear after using the windshield washer or if a wiper
blade chatters when running, wax or other material may be on the blade or windshield.
Clean the outside of ...
Cruise control
1. ACCEL/RES switch
2. COAST/SET switch
3. CANCEL switch
4. ON·OFF switch ...