
Forward-facing child restraint installation using LATCH
Do not use the lower anchors if the combined weight of the child and the child restraint exceeds 65 lbs. (29.5 kg). If the combined weight is greater than 65 lbs. (29.5 kg), install the child restraint with the vehicle's seat belt, not the lower anchors. Always follow the child restraint manufacturer's instructions, because the approved attachment method, tightening procedure, top tether use, and final movement check can vary by restraint design.
Follow these steps to install a forward-facing child restraint in the rear bench seats of the Nissan Murano using the LATCH system:
1. Position the child restraint on the seat. Place it squarely against the seat cushion and seatback so it sits evenly before the lower anchor attachments are connected.
Always follow the child restraint manufacturer's instructions for the correct seating position, recline angle, connector orientation, and any required top tether routing.
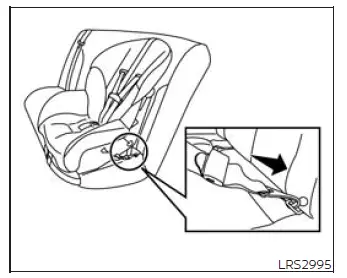
Forward-facing webbing-mounted -
step 2
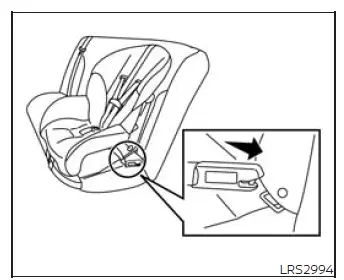
Forward-facing rigid-mounted - step 2
2. Secure the child restraint anchor attachments to the LATCH lower anchors. Make sure each connector is attached directly to the correct lower anchor and is not twisted, caught against trim, or connected to any nearby seat belt hardware.
Check to make sure the LATCH attachment is properly attached to the lower anchors. The restraint should be connected firmly at both lower attachment points before tightening begins.
If the child restraint is equipped with a top tether strap, route the top tether strap as directed by the restraint manufacturer and secure it to the proper tether anchor point.
Do not install child restraints that require the use of a top tether strap in seating positions that do not have a top tether anchor. A required tether must be attached only to the designated anchor point.
3. The back of the child restraint should be secured against the vehicle seatback. A firm contact surface helps the restraint sit correctly and reduces unwanted movement during use.
If necessary, adjust or remove the head restraint/headrest to obtain the correct child restraint fit. If the head restraint/headrest is removed, store it securely so it cannot move through the cabin during sudden braking or a collision. Be sure to reinstall the head restraint/headrest when the child restraint is removed. If the seating position does not have an adjustable head restraint/headrest and it interferes with proper child restraint fit, try another seating position or use a different child restraint that fits the seat correctly.
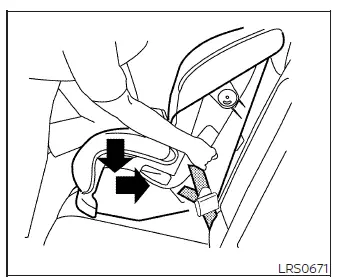
Forward-facing - step 4
4. For child restraints equipped with webbing-mounted attachments, remove any additional slack from the anchor attachments. Press downward and rearward firmly in the center of the child restraint with your knee to compress the vehicle seat cushion and seatback while tightening the webbing. This helps the child restraint settle tightly against the rear bench seat and improves the security of the LATCH installation.
5. Tighten the tether strap according to the manufacturer's instructions to remove any slack. The tether strap should be routed correctly, attached to the proper anchor, and tightened enough to support the forward-facing restraint without pulling it out of its intended position.
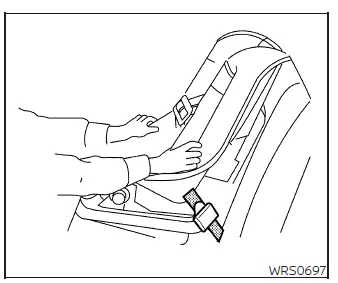
Forward-facing - step 6
6. After attaching the child restraint, test it before placing the child in it. Push it from side to side while holding the child restraint near the LATCH attachment path. The child restraint should not move more than 1 inch (25 mm) from side to side. Tug it forward and confirm that the LATCH attachments hold the restraint in place. If the restraint is not secure, tighten the LATCH attachments as necessary, or place the restraint in another seating position and test it again.
You may need to try a different child restraint. Not all child restraints fit all vehicle seats, so the installation in the Nissan Murano must be checked carefully before the restraint is used.
7. Check that the child restraint is properly secured before each use. If the child restraint is loose, repeat steps 2 through 6 until the lower attachments, tether strap, and restraint body are all secure.
See also:
Meters and gauges
1. Tachometer
2. Warning/indicator lights
3. Vehicle Information Display
4. Speedometer
5. Fuel gauge
6. Odometer/Twin trip odometer
7. Engine coolant temperature gauge ...
Care of the soft top and the vehicle body
To use your CrossCabriolet safely and comfortably,
you need to observe all the warnings and
cautions shown in the previous pages. Also, to
maintain a good appearance of the soft top and
the vehicl ...
How to use the NISSAN controller
Use the NISSAN controller to choose an item on
the display screen. Highlight an item on the display
using the main directional buttons 2 or the
center dial 3 . Then press the ENTER button 1
to s ...