Difference between predicted and actual distances
The distance guide line and the vehicle width guide line should be used as a reference only when the vehicle is on a level, paved surface. The distance viewed on the monitor is for reference only and may be different than the actual distance between the vehicle and displayed objects.
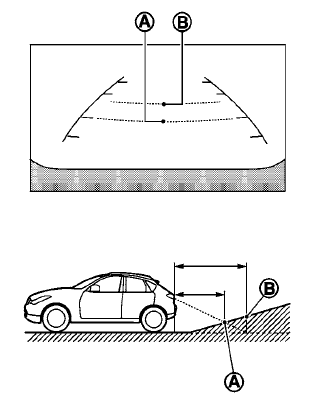
Backing up on a steep uphill
When backing up the vehicle up a hill, the distance guide lines and the vehicle width guide lines are shown closer than the actual distance.
For example, the display shows 3 ft (1.0 m) to the
place A , but the actual 3 ft (1.0 m) distance on
the hill is the place B . Note that any object on
the hill is further than it appears on the monitor.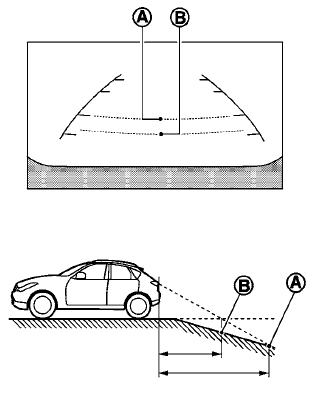
Backing up on a steep downhill
When backing up the vehicle down a hill, the distance guide lines and the vehicle width guide lines are shown farther than the actual distance.
For example, the display shows 3 ft (1.0 m) to the place A , but the actual 3 ft (1.0 m) distance on the hill is the place B . Note that any object on the hill is closer than it appears on the monitor.
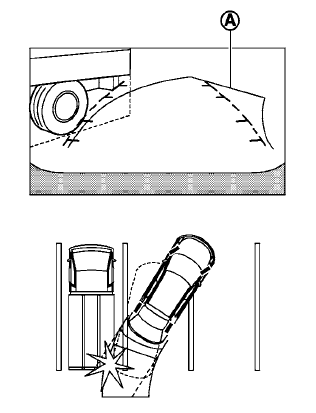
Backing up near a projecting object
The predicted course lines A do not touch the object in the display. However, the vehicle may hit the object if it projects over the actual backing up course.
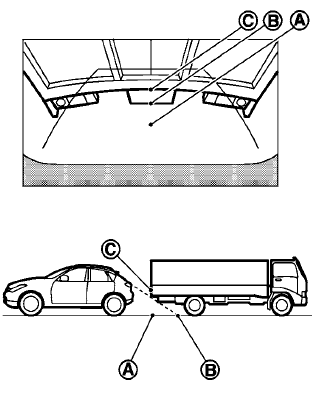
Backing up behind a projecting object
The position C is shown farther than the position B in the display. However, the position C is actually at the same distance as the position A .
The vehicle may hit the object when backing up to the position A if the object projects over the actual backing up course.
See also:
Rear window and outside mirror defroster switch
Type A
Type B
To defog/defrost the rear window glass and
outside mirrors (if so equipped), start the engine
and push the switch 1 on. The indicator light
2 will come on. Push the switch again ...
Rear seats (Hardtop models)
Folding
Before folding the rear seats:
• Secure the
seat belts on the seat belt hooks
on the side wall. (See “Seat belt hooks
(Hardtop models)” later in this section.)
• Disconnect an ...
Operating tips
● When the engine coolant temperature and
outside air temperature are low, the air flow
from the foot outlets may not operate for a
maximum of 150 seconds. However, this is
not a malfunction ...